
-
12.
Settings
-
12.1
User
-
12.1.1
Creating a new user
To create a new user:
- Log in to the uniFi+ Administration module
- Select Settings from the options on the Main menu

- Under the Users tap, select + New User to go to a blank edit screen.
- Set the following configurations:
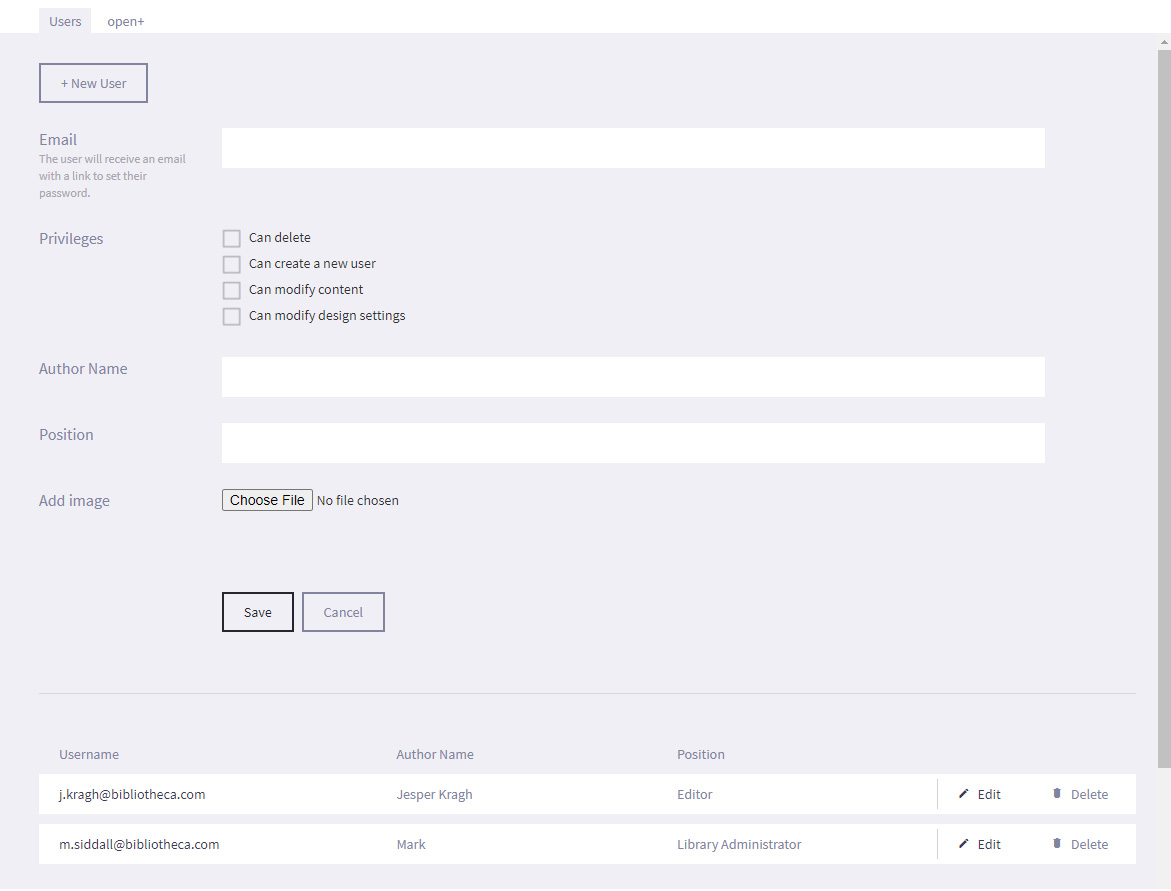
- Email - Edit the E-mail address that will be used as your user name. It is also the e-mail address that will be used to send notifications to, such as resetting your password.
- Priveleges - Set the permissions of the user on the uniFi+ Administration module.
- Can delete - Allows the user to delete users and content.
- Can create a new user - Allows the user to create new users for the admin module.
- Can modify content - Allows the user to edit content.
- Can modify design settings - Allows the user to modify design settings for the screen.
- Author Name - Edit the Author name of the user that can be associated to an article. This helps define who wrote or is responsible for each article and will be displayed on the article.
- Position - Edit the position of the user in the library.
- Picture - Choose an image to represent the author. This will be displayed on the article if an author is defined.
- Select Save.
-
12.1.1
-
12.2
Open+
You can configure which collections are displayed on the screen depending on the open+™ state of the library (staffed, unstaffed and closed).
For example, during unstaffed hours, you may wish to focus on essential and practical information that would normally be covered by staff, including "point and direct" questions that can now be covered by the Wayfinding widget. To set which collections are displayed during an open+™ state:

- Log in to the uniFi+ Administration module,
- Select Settings from the options on the Main menu
- Go to the Open+ tap
- Under the relevant header (Touch collections or Info collections), place a tick in the required checkboxes next to the collection to specify when the collection will be displayed. You can select a collection to be displayed in both staffed and unstaffed open+™ modes,
- You can choose to display collections when the library is closed. bibliotheca only recommend setting this option for display collections (that do not require additional physical interaction), on screens that can be viewed from the outside of the library, and only on screens that are not automatically shutdown by open+™.
- Changes are saved automatically.
- You can preview what each screen will look like in each state by selecting the Monitor icon in the Preview column
-
12.1