-
5.
Presentations
A Presentation can best be described as the format that you want to display your content (Articles) in.
Cross application display
For Basic, Bookshelves and Calendars, the same presentation can be used across multiple screens, incuding +activs, +displays and +idles.Presentations that only work on +activs, e.g. timeline and quizzes can of course be reused across all your +activ screens.
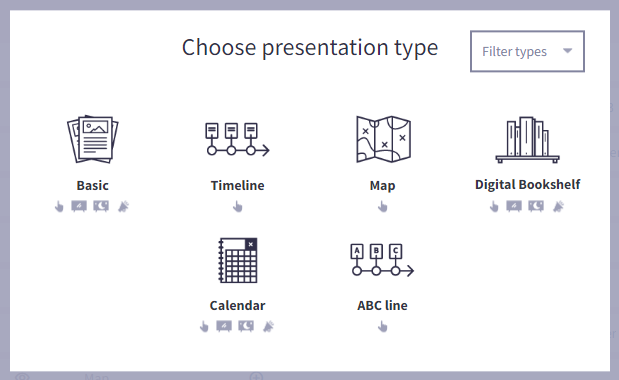
The different presentation types- Basic
As the name suggests it's the basic and most simple presentation for displaying a collection of articles
On uniFi+display / uniFi+idle: A container for fullscreen article slides.
On uniFi+activ: Displays an overview page with multiple selectable articles. - Timeline (uniFi+activ only)
Assign dates to your articles and display them on a horizontal scrollable timeline, with the oldest articles on the left, and the newest on the right.
You can also add “Timeline Texts” to be displayed at specific dates. - Map (uniFi+activ only)
Upload an image and assign articles to different locations on it. - Digital Bookshelf
Display a range of library items as a Digital Bookshelf. Items can be added manually as articles or by searching the LMS / ILS.
Displaying works just like Article Collections with each display types in respect and with material information added to the article.
On uniFi+activ the images are placed on shelves to give a real bookshelf feel. - Calendar
Create event articles manually or pull information from an external source, such as an Events system.
On uniFi+display: Three types of display are available, letting you choose how many events are shown on screen at the same time.
On uniFi+activ: The Calendar acts like a normal Article Collection, but with event information added to the article. - ABC line (uniFi+activ only)
Display articles on a line in alphabetical order, either based on the first letter of the article title or a specified letter.

-
5.1
Basic
On uniFi+activ the Basic presentation type displays the articles as tiles on the screen. The patron can simply press the relevant tile to see the article in full. There are typically space for eight article buttons. When exceeding this you can chose if the user should scroll sideways or vertically.
- Presentation Title - This is the title of the presentation.
- Article Tile - Selecting this tile will prompt the article to be displayed in full. If you link a question article to the Article Collection presentation, selecting the tile will display the article image only.
The article that is at the top of the Assigned Articles list will be displayed first (the Death of Julius Caesar article in the screenshot above), with subsequent articles being displayed as ordered in the list. - Home - Selecting the Home icon will take the patron back to the main screen, where they can pick between the root content of the uniFi+activ.
- Additional presentations/widgets - Selecting the Ellipsis (...) button will bring up a list of other presentations (or widgets) linked to the currently selected Collection. The patron can select one of the listed presentations/widgets and be taken to the relevant screen.
On uniFi+display / uniFi+idles the same information is displayed but only one article at the time and with the whole article text shown.
-
5.1.1
Creating a "Basic" presentation
To create an Basic presentation:
- Select Presentations from the options on the Main screen.

- Select + Add Presentation and choose the "Basic" presentation.
- Under the Content tab, enter the Title and Text.

- Select the + Choose Articles and link the required link articles to the presentation.
You can add Poll articles to link Polls to the Basic presentationYou can reorder the order in which the assigned articles are displayed by scrolling over the required article (until you see a hand icon) and moving the article up and down the list, as desired.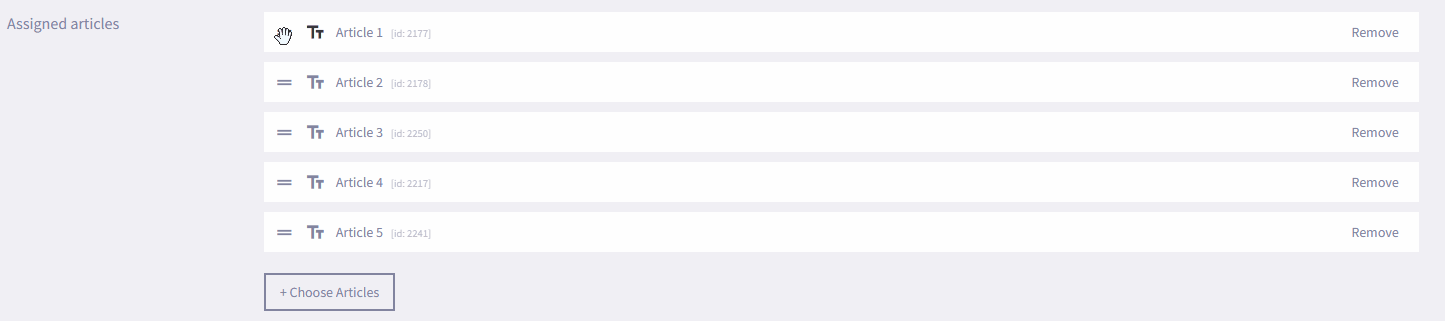
- Select Save.
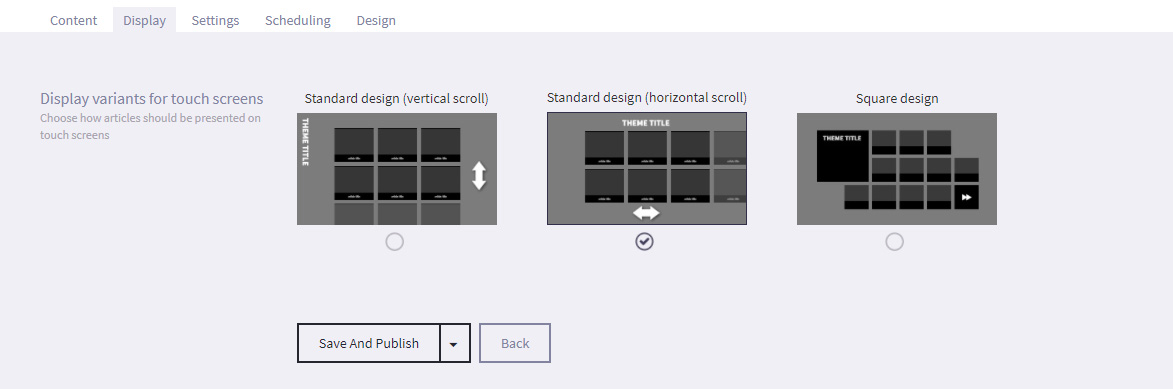
- Under the Display tab, select the format (Square or Standard) that you wish to display the Article tiles in from the Display variants settings. Only relevant for uniFi+activ devices.
- Select Save and Publish (or Save as draft if not ready to publish)
- Under the Settings tab you can select the Show title on +display and +idles checkbox if you want the title of the presentation to be displayed on each article within the article collection. This only applies to articles used on +display or as +idles.
- Additionally, you can assign tags to presentation so that it is easier to search for later. For example, if the presentation is part of your Roman collection, you can enter a tag such as Rome on all articles and presentations that should be included, or you could also enter a tag such as Julius Caesar so that you can quickly search for a specific subject. You can add multiple tags to a presentation or article.
- From the Scheduling tab, you can set a time limit for the specific dates and times that the presentation will be displayed by selecting Active time limit and entering the required Start and End dates and times.
- Under the Design tab, select Choose File and navigate to the location of the image to use as a background image.
We recommend a resolution of 1920 x 1080 pixel for applications in landscape view. - Select Save and Publish (or Save as draft if not ready to publish).
- Select Presentations from the options on the Main screen.
-
5.2
Digital Bookshelf
On uniFi+activs, a Digital Bookshelf is a simple display of books or other materials (articles) placed on one or more shelves - and you can configure the view to scroll either vertically or horizontally.
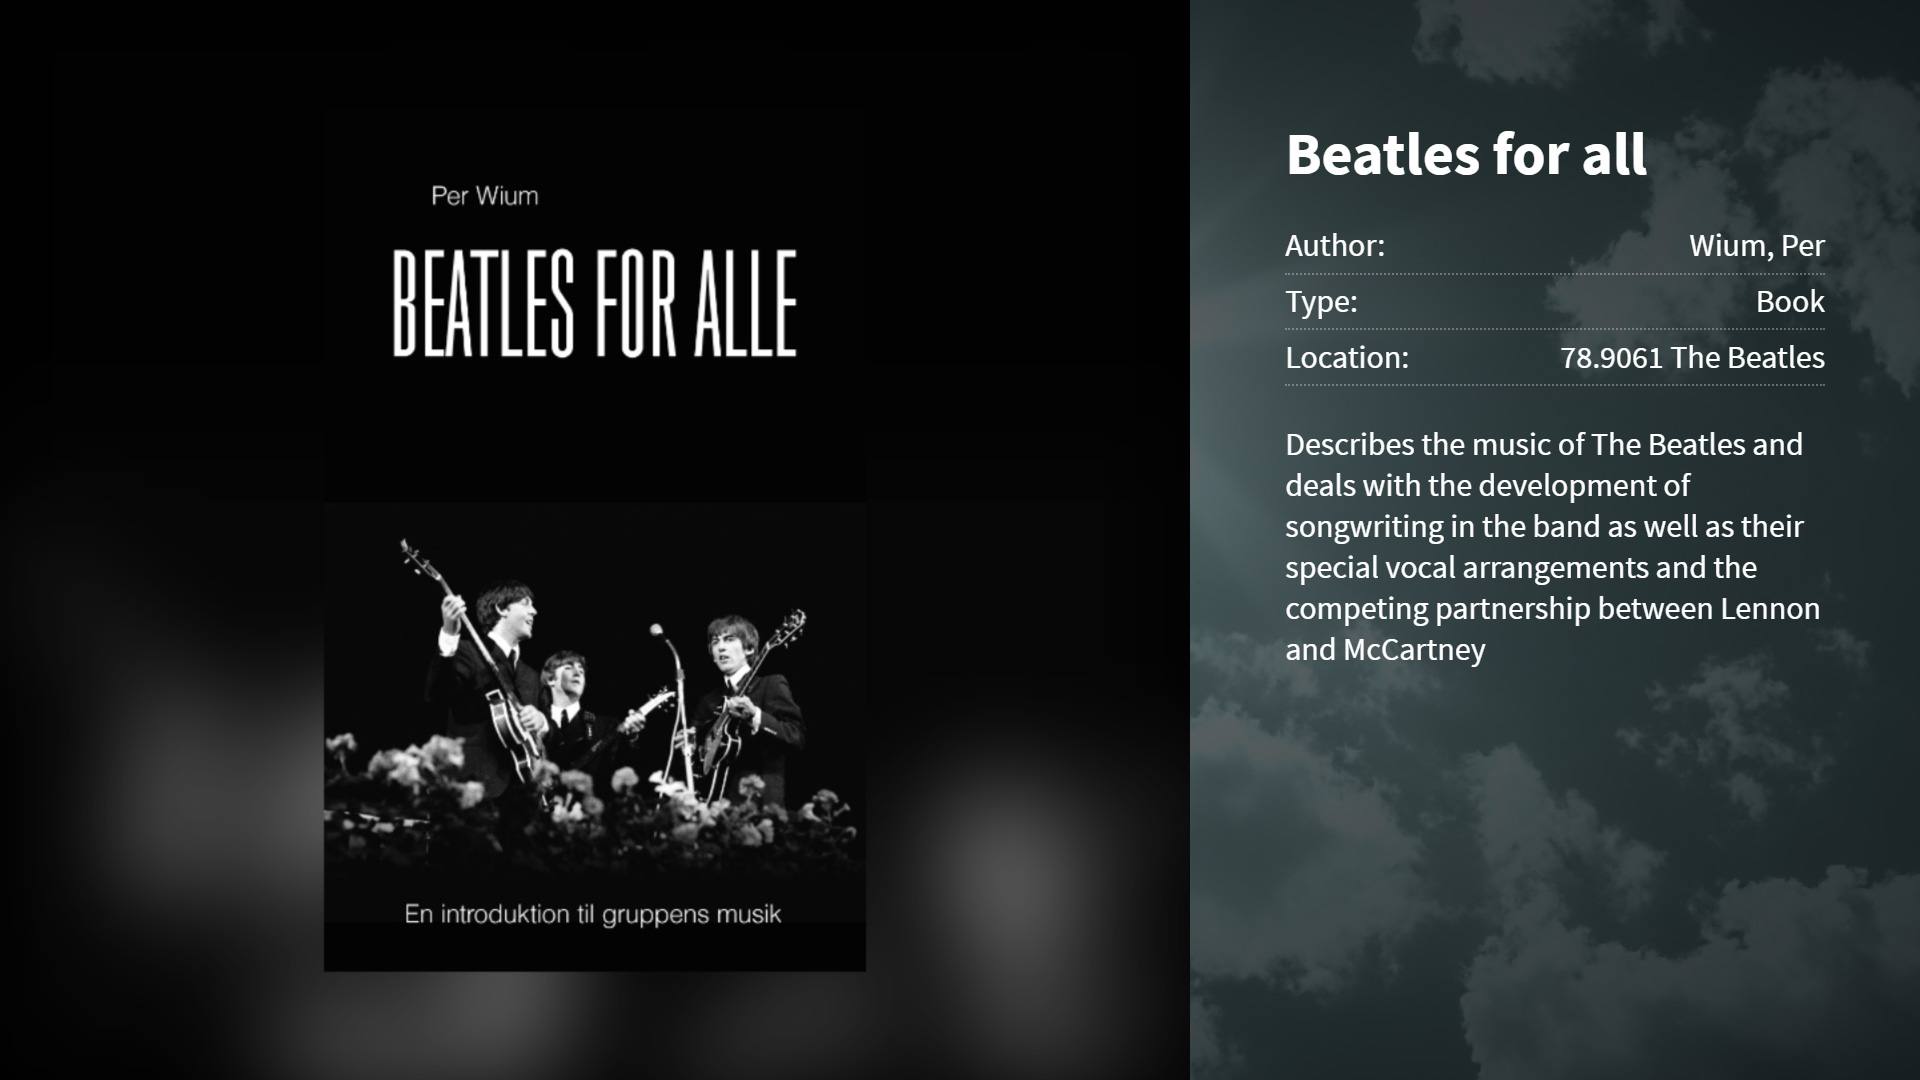
On uniFi+displays / uniFi+idles the materials of the presentation are presented one at the time, with an image (e.g. bookcover) on the left and information on the right.
The articles you attach to a Digital Bookshelf has to be specialized as a library material, containing material type, author, location and more.
See Specialized Articles.Note: Scandinavian countries can use ILS/LMS to automatically create bookshelf-presentations from a material database by using search queries. More on that in a later paragraph.
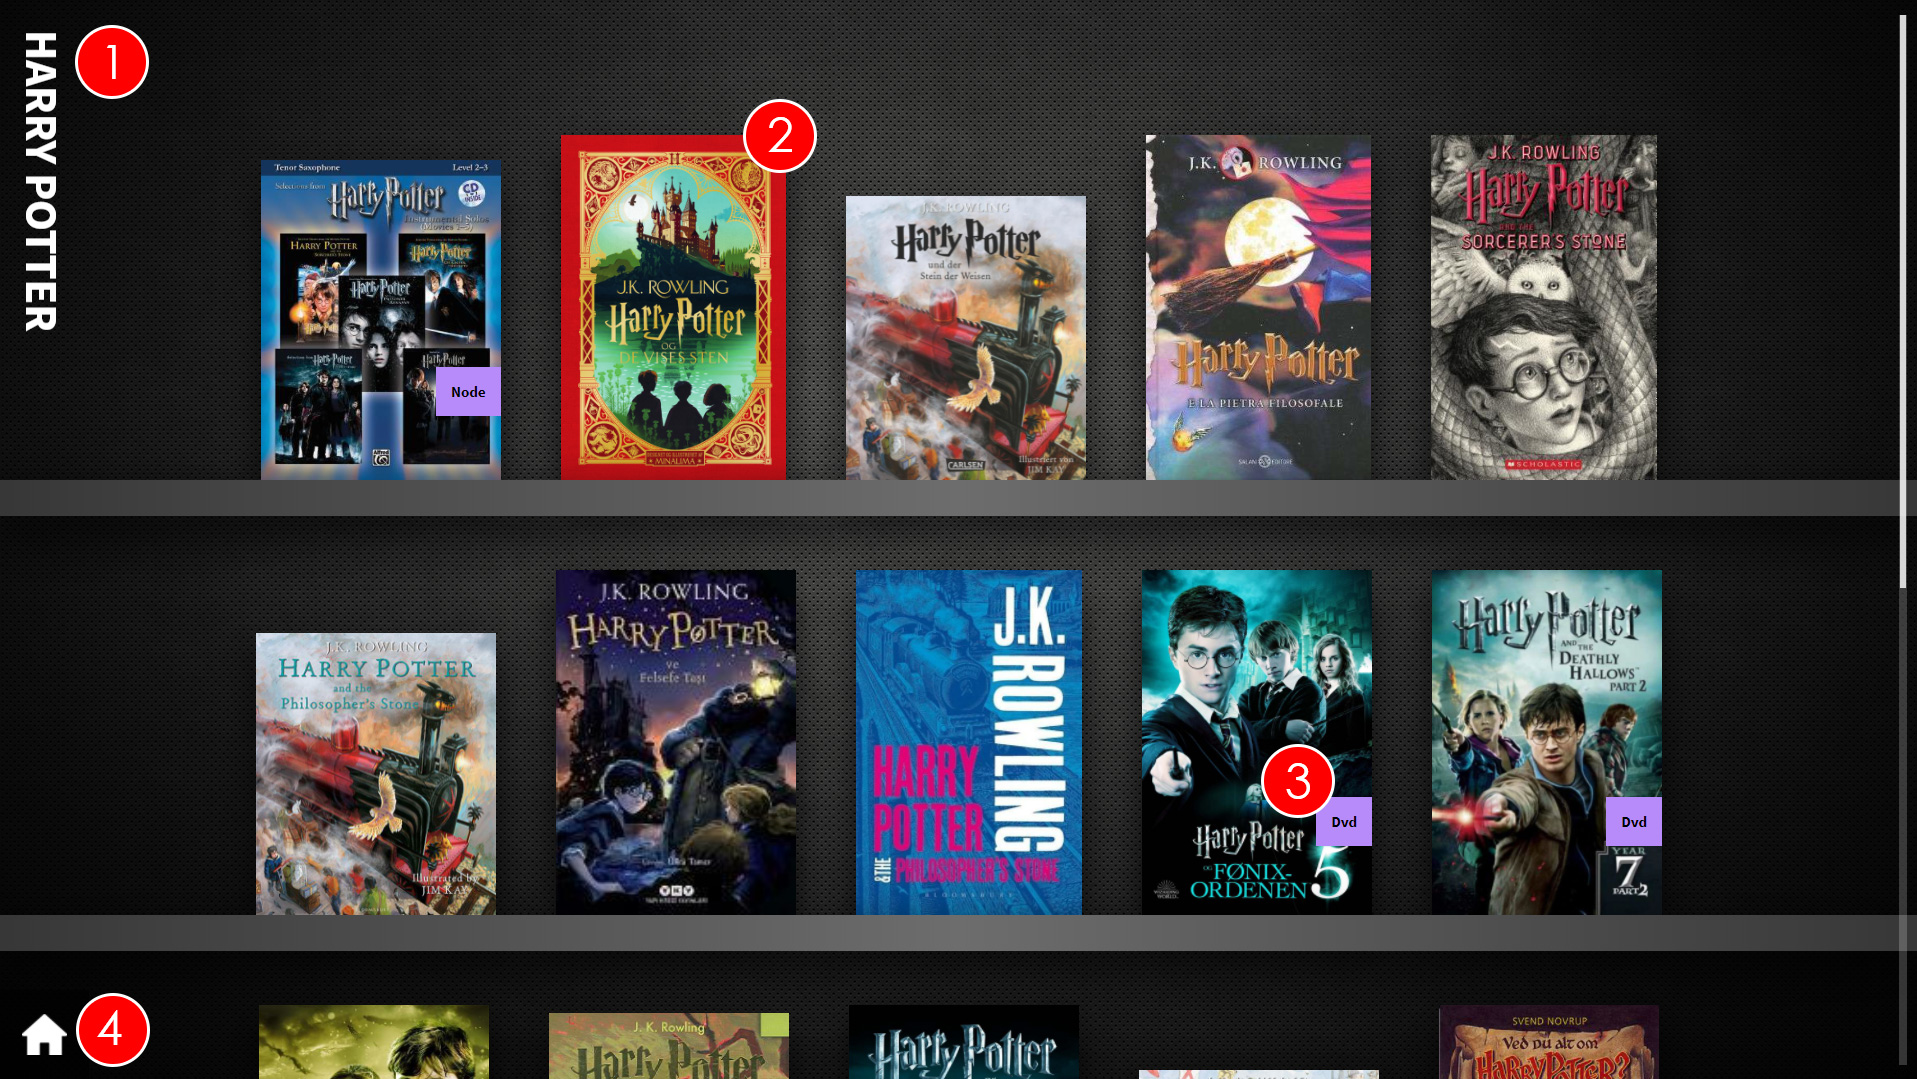
- Bookshelf title - This is the presentation title. It should let the patron know the common link between the items on the bookshelf.
This could be that they are all by a single author, in a single genre, about the same subject or are recommended reads / new items in the library. - Item Cover - This is the cover of the item - the first image in the articles media section or as pulled from the LMS / ILS.
- Item Type - This is the item type label and tells the patron if the item is a Book, DVD, CD, eBook or Game.
- Home - Selecting the Home icon will take the patron back to the main screen, where they can pick between the root content of the uniFi+activ.
If the patron presses one of the covers on screen, the item information for the selected item will be displayed.
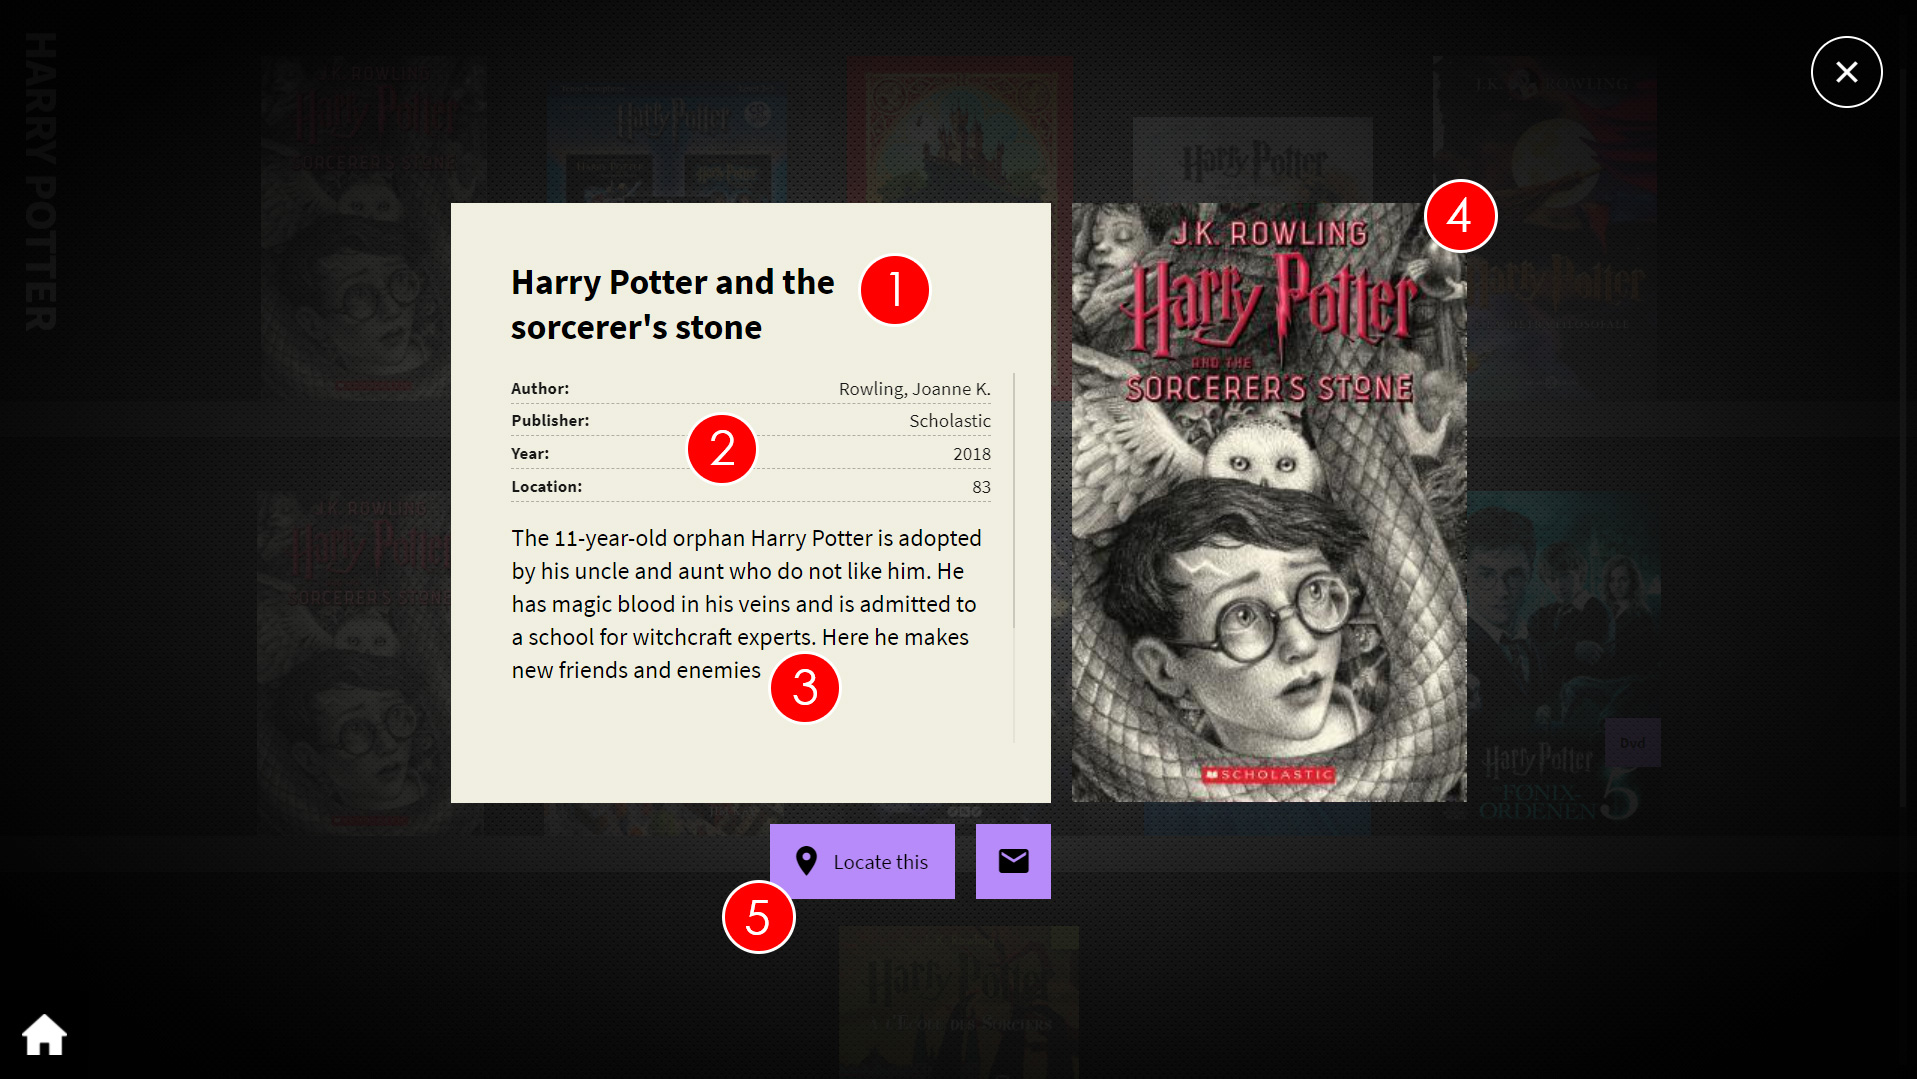
- Item Title - This is the item title.
- Item Information - This is the Author, Location and Item Type information for the selected item.
- Item Text - This is the summary text for the selected item.
- Item Cover - This is the cover of the item (the first image in articles media list).
- Locate items via wayfinding - This function is only available if the uniFi+activ has a wayfinding widget, and this contains a location mark spanning over the items location number.
Book display on +display-
5.2.1
Creating a Digital Bookshelf article
To create a Digital Bookshelf Article:
- Select Articles from the options on the Main screen.

- Select the + Add Article button, l If the article already exists, select the Edit button next to the Article title in the list.
- In the Edit article section, select the Content tab and add in the Item title and the item description text.
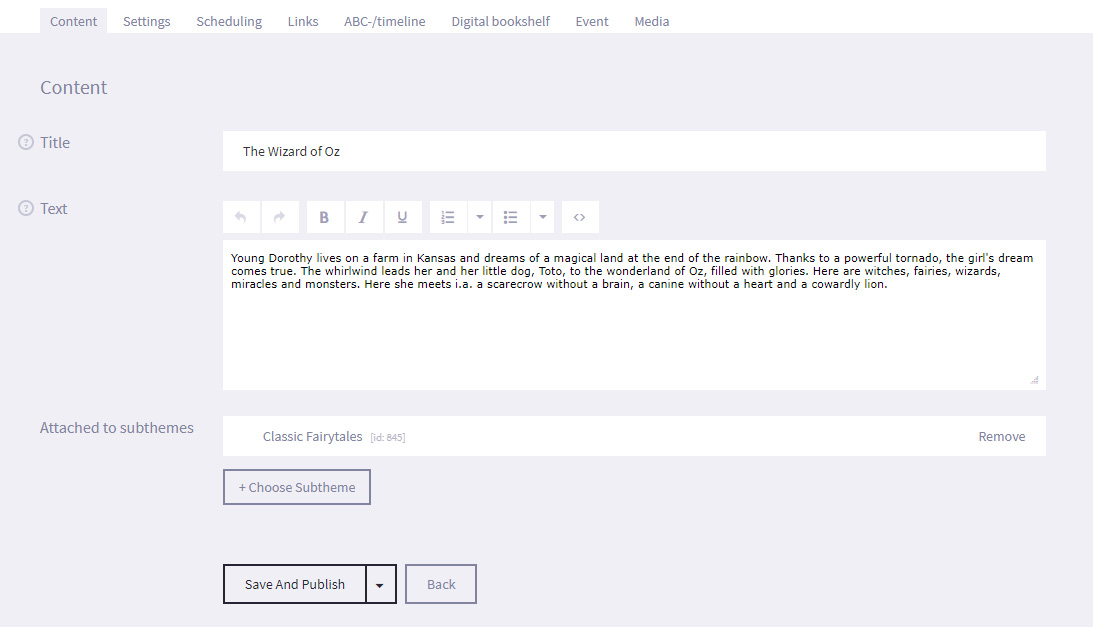
- Select the Save button at the bottom of the screen. You have created the article and it will now appear under the articles list once you return to it.
- Select the Digital bookshelf tab and enable the Active book data for the article setting in the Book Information field.
- Configure the Location, Author and Material Type settings that appear.
- Location - The location of the item in the library.
- Author - The author of the item.
- Material Type - The item type of the item. Select from Book, DVD, CD, eBook and Game.
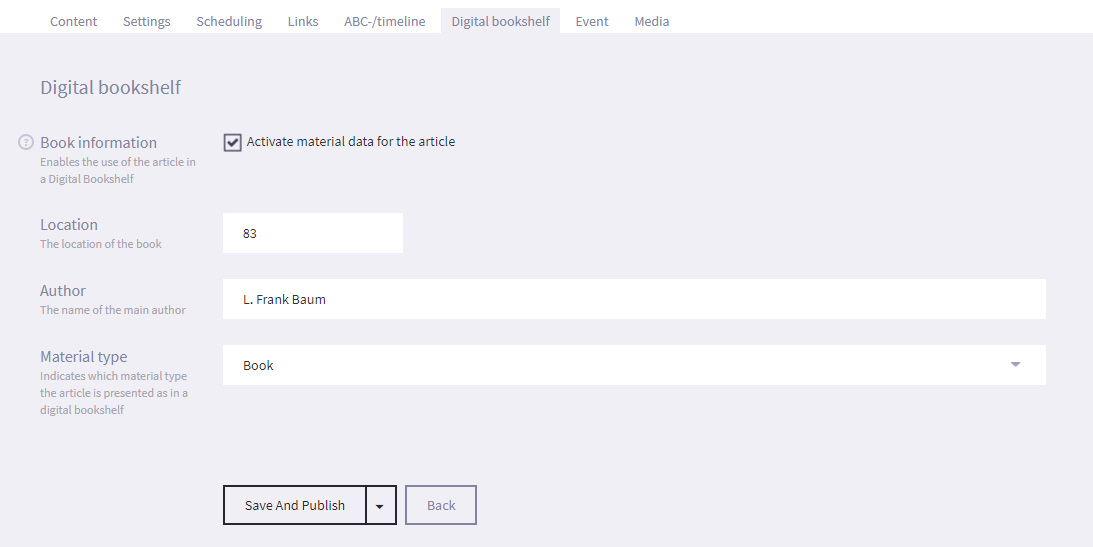
- Select Save.
- Select the Media tab and select the + Add Picture button to specify the item cover.

- Navigate to the location of the media file on your computer and select it.
- The media file will now appear on the Media Tab.
- Select Edit next to the media file. You can change the media file, and add the text that will be displayed with the media file.
You should treat the text as a mini-article that gives more specific information about the subject of the image, video or sound file.You can also write an Internal Note such as additional information to research, or the presentations that the article is linked to (and any start and end dates). This text is not seen by patrons. - Select the Save button at the bottom of the screen.
- Select Articles from the options on the Main screen.
-
5.2.2
Creating a Digital Bookshelf
To create a Bookshelf presentation:
- Select Presentation from the options on the Main screen.
- Select + Add Presentation and choose the Digital Bookshelf presentation.
- You will see the Edit screen. Under the Content tab, enter the Title (which will be displayed on screen) and optional Text (which is not displayed on screen).
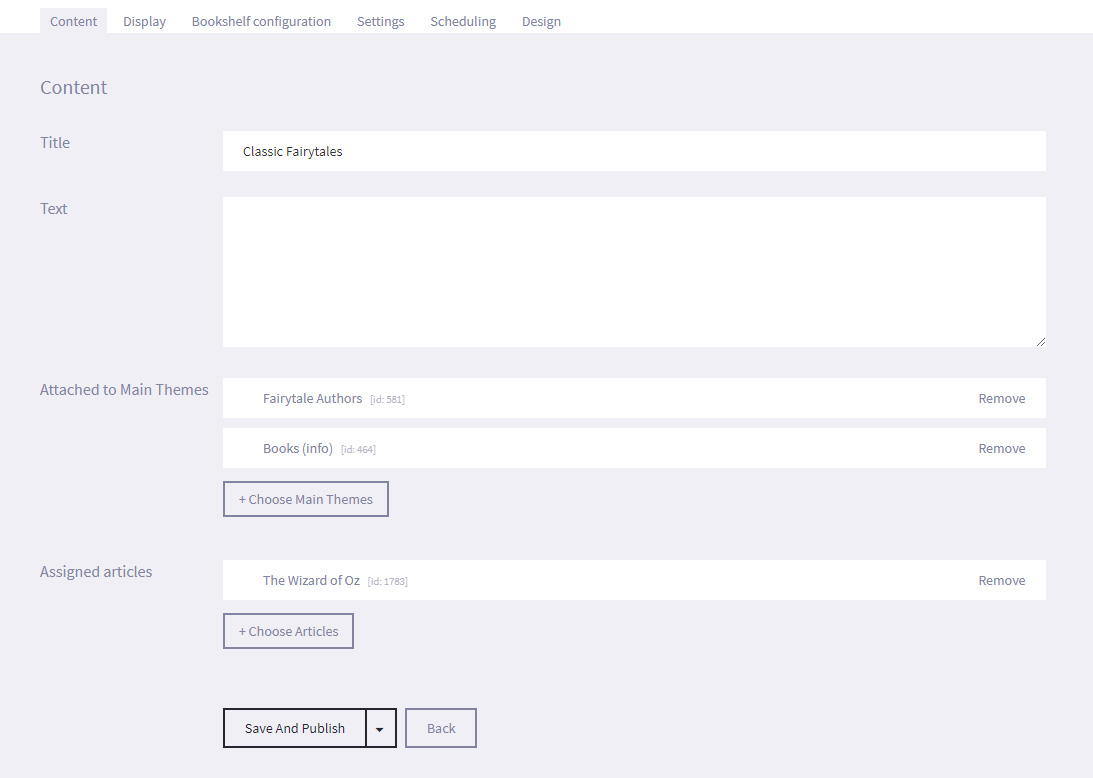
- Select Save and Publish (or Save as draft if not ready to publish).
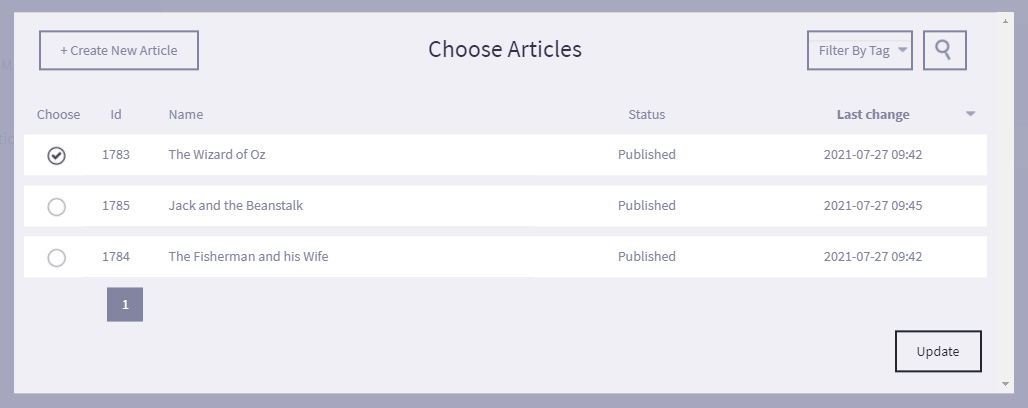
- Now for adding items, select + Choose Article next to the "Assigned articles" field, and select the articles required and Update. Only articles that have had Digital Bookshelf functionality enabled will appear in the list.
- Select Save.
- Under the Design tab, select Choose File and navigate to an image on your computer to use the selected image as a Background for your Digital Bookshelf.
- Select Save.
- Select Presentation from the options on the Main screen.
-
5.2.3
Creating a Digital Bookshelf using LMS/ILS
To create a Bookshelf presentation using ILS/LMS (so far Scandivavian countries only):
- Select Presentation from the options on the Main screen.
- Select + Add Presentation and choose the Digital Bookshelf presentation.
- You will see the Edit screen. Under the Content tab, enter the Title (which will be displayed on screen) and optional Text (which is not displayed on screen).
- Select Save and Publish (or Save as draft if not ready to publish).
- Under the Bookshelf Configuration tab, set the maximum number of results that willbe pulled from the LMS / ILS to appear on the bookshelves in the No. of materials for the CQL query field, and tick the Include only results with image to only show results that the LMS / ILS has a cover image for.
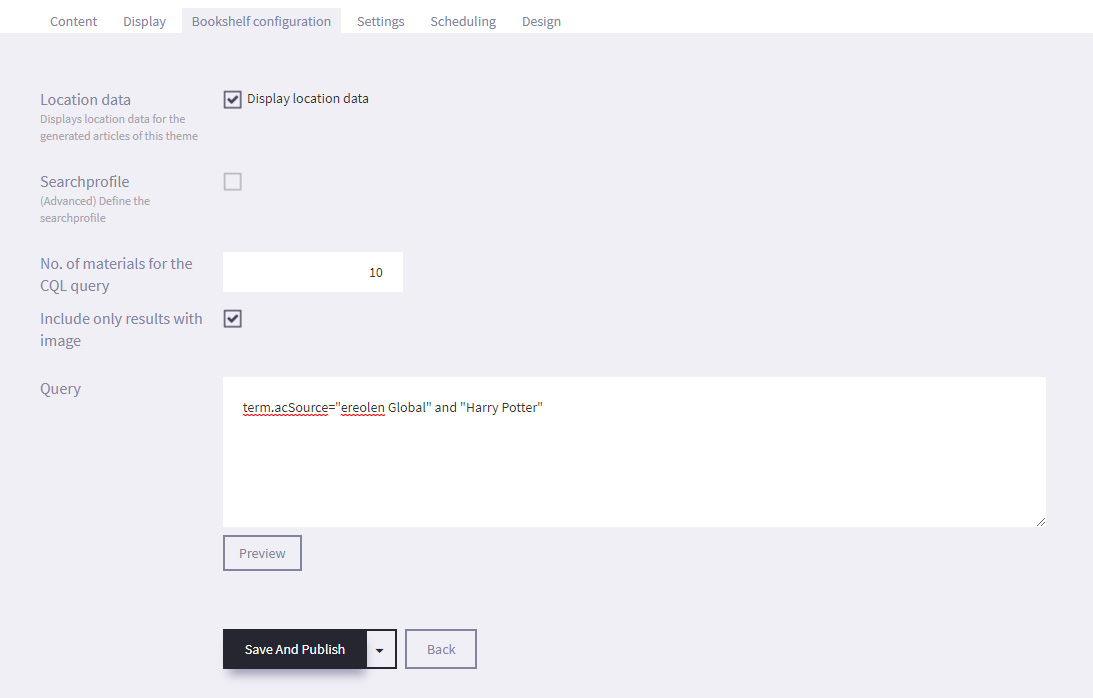
- Create a CQLQuery .
For example, term.acSource="database name" and "search word"
term.acSource="ereolen Global" and "Harry Potter" - Select Preview to see the results that have been pulled from the LMS / ILS.
Scrolling over a cover will enlarge the image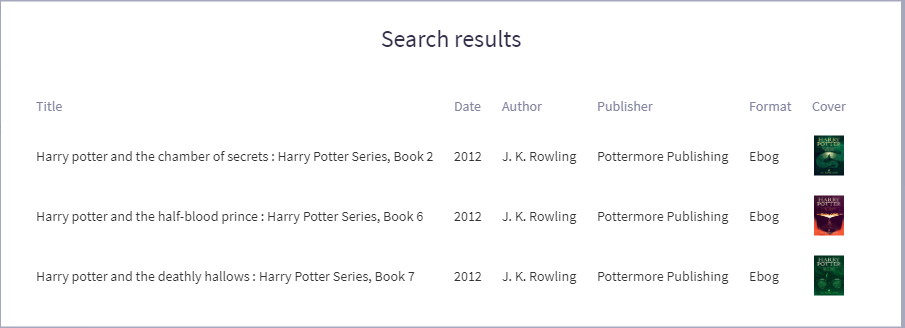
- Select Save.
- You can still manually add additional material items: Go back to the Content -tab. Select + Choose Article next to the Assigned articles field, and select the articles required and Update. Only articles that have had Digital Bookshelf functionality enabled will appear in the list.
- Under the Design tab, select Choose File and navigate to an image on your computer to use the selected image as a Background for your Digital Bookshelf.
- Select Save.
- Select Presentation from the options on the Main screen.
- Bookshelf title - This is the presentation title. It should let the patron know the common link between the items on the bookshelf.
-
5.3
Calendar
Links to external sources (Event systems, RSS feeds, websites) must be configured by bibliotheca.
A Calendar is a presentation that pulls information from an external source, such as an Events system, and displays it on screen as tiles that can be pressed to get more information. If you have no external event integrations, it is possible to create your own event articles, see Articles section. The images below show an example of information pulled from an Events system.
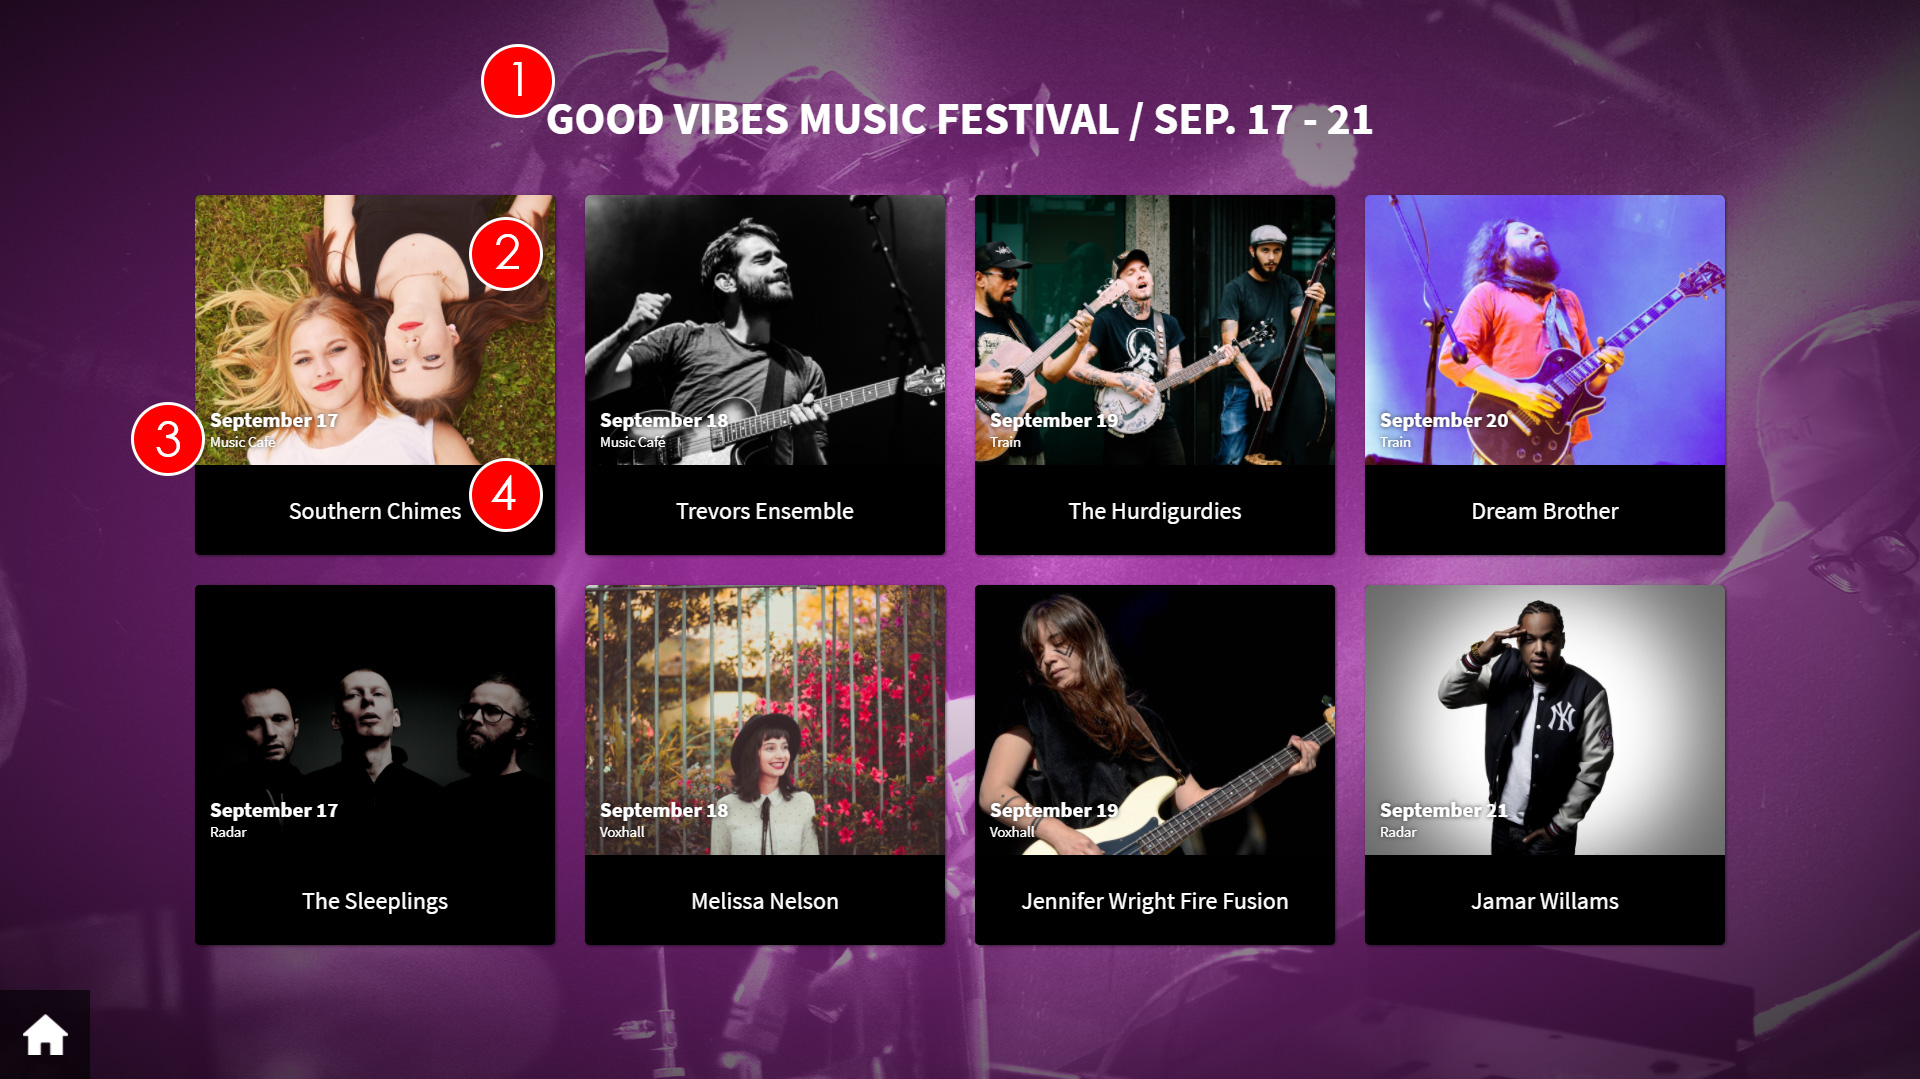
- Presentation title- This is the title of the presentation
- Event Image - This is the image associated to the event, as pulled from the external system.
- Event Date - This is the date of the event, as pulled from the external system.
- Event Title - This is the title of the event, as pulled from the external system
If the patron presses one of the tiles on screen, the information for the selected event will be displayed.
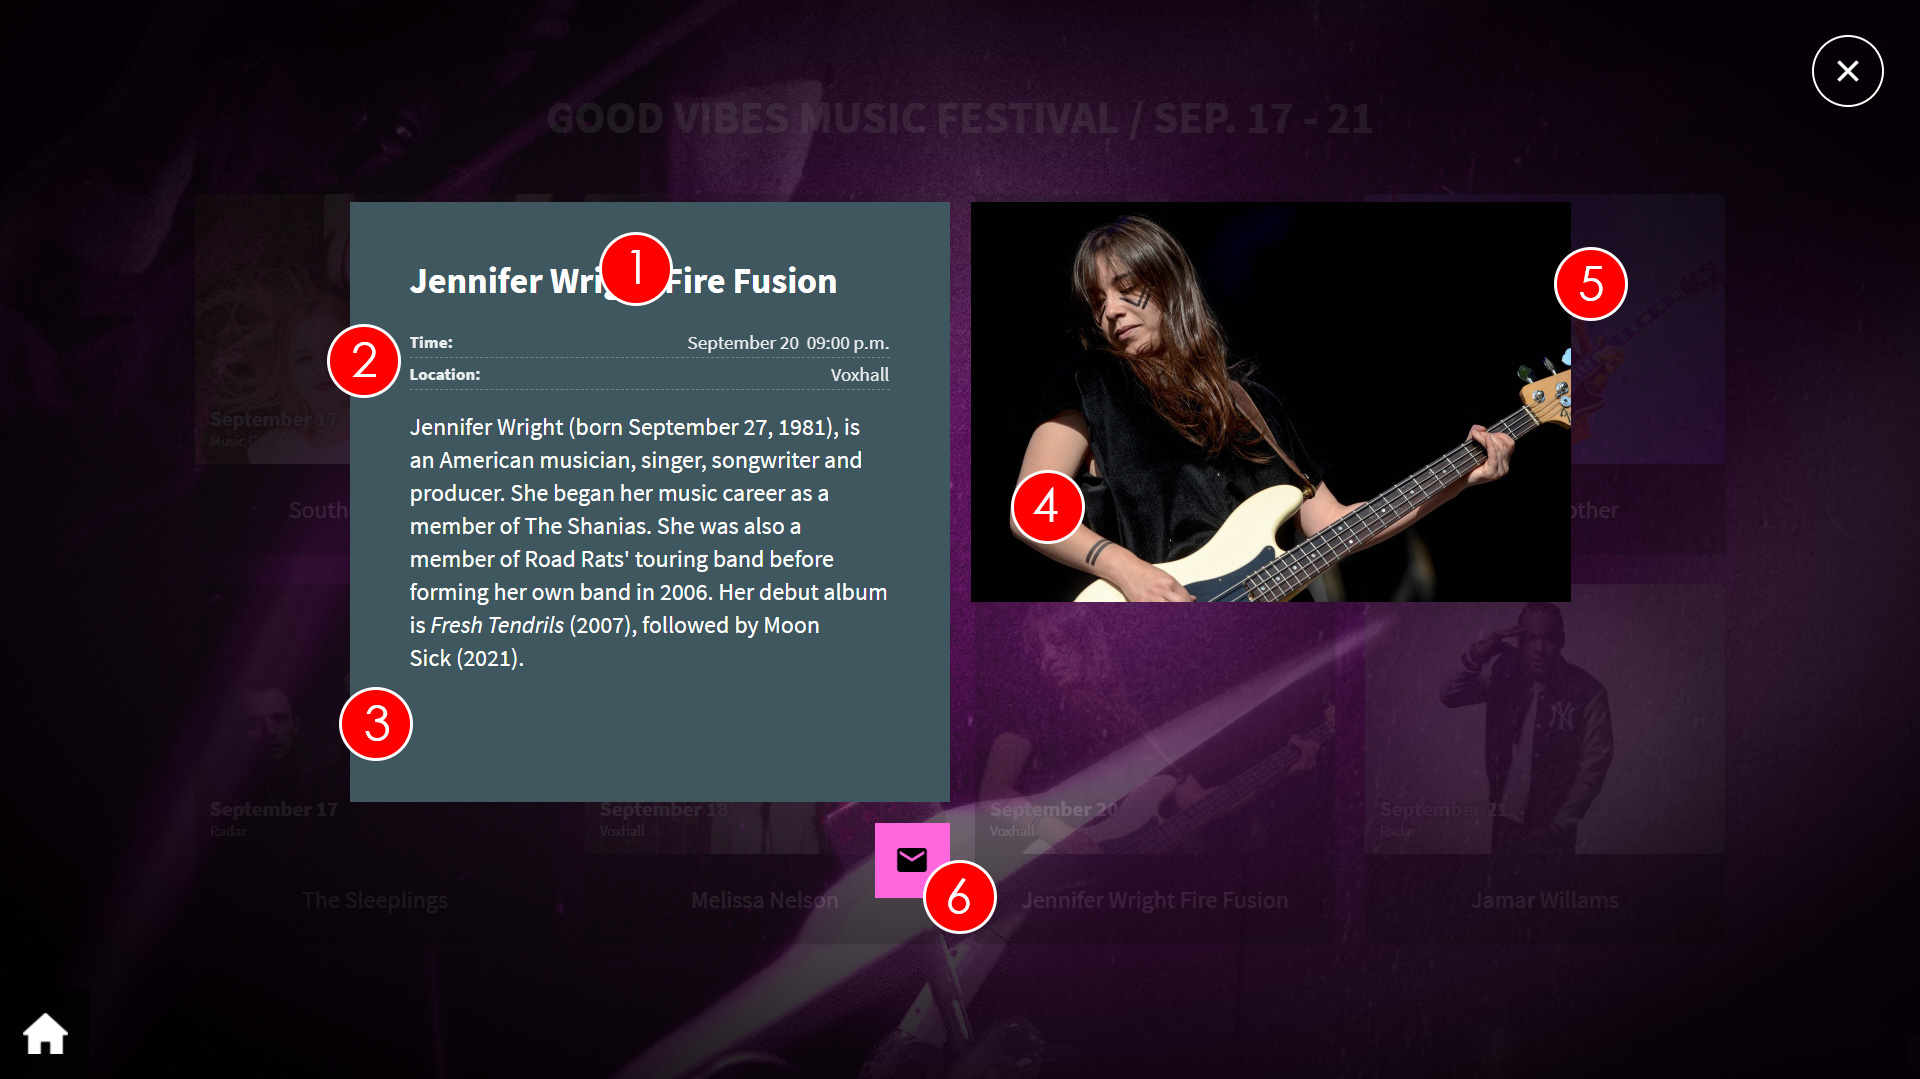
- Event Title - This is the title of the event, as pulled from the external system.
- Event Details - This is the location and time and date of the event, as pulled from the external system.
- Event Information - This is the description of the event, as pulled from the external system.
- Event Image - This is the image associated to the event, as pulled from the external system.
- Sound in image - Only possible for manually created articles, see sound in image
- Send article to mail - The patron can here insert their e-mail address, and get the article sent so they can read up on it later
On uniFi+display / +idle you can show one, four or up to 28 events at the same time with the new "Flexical"-display. More on the display type below.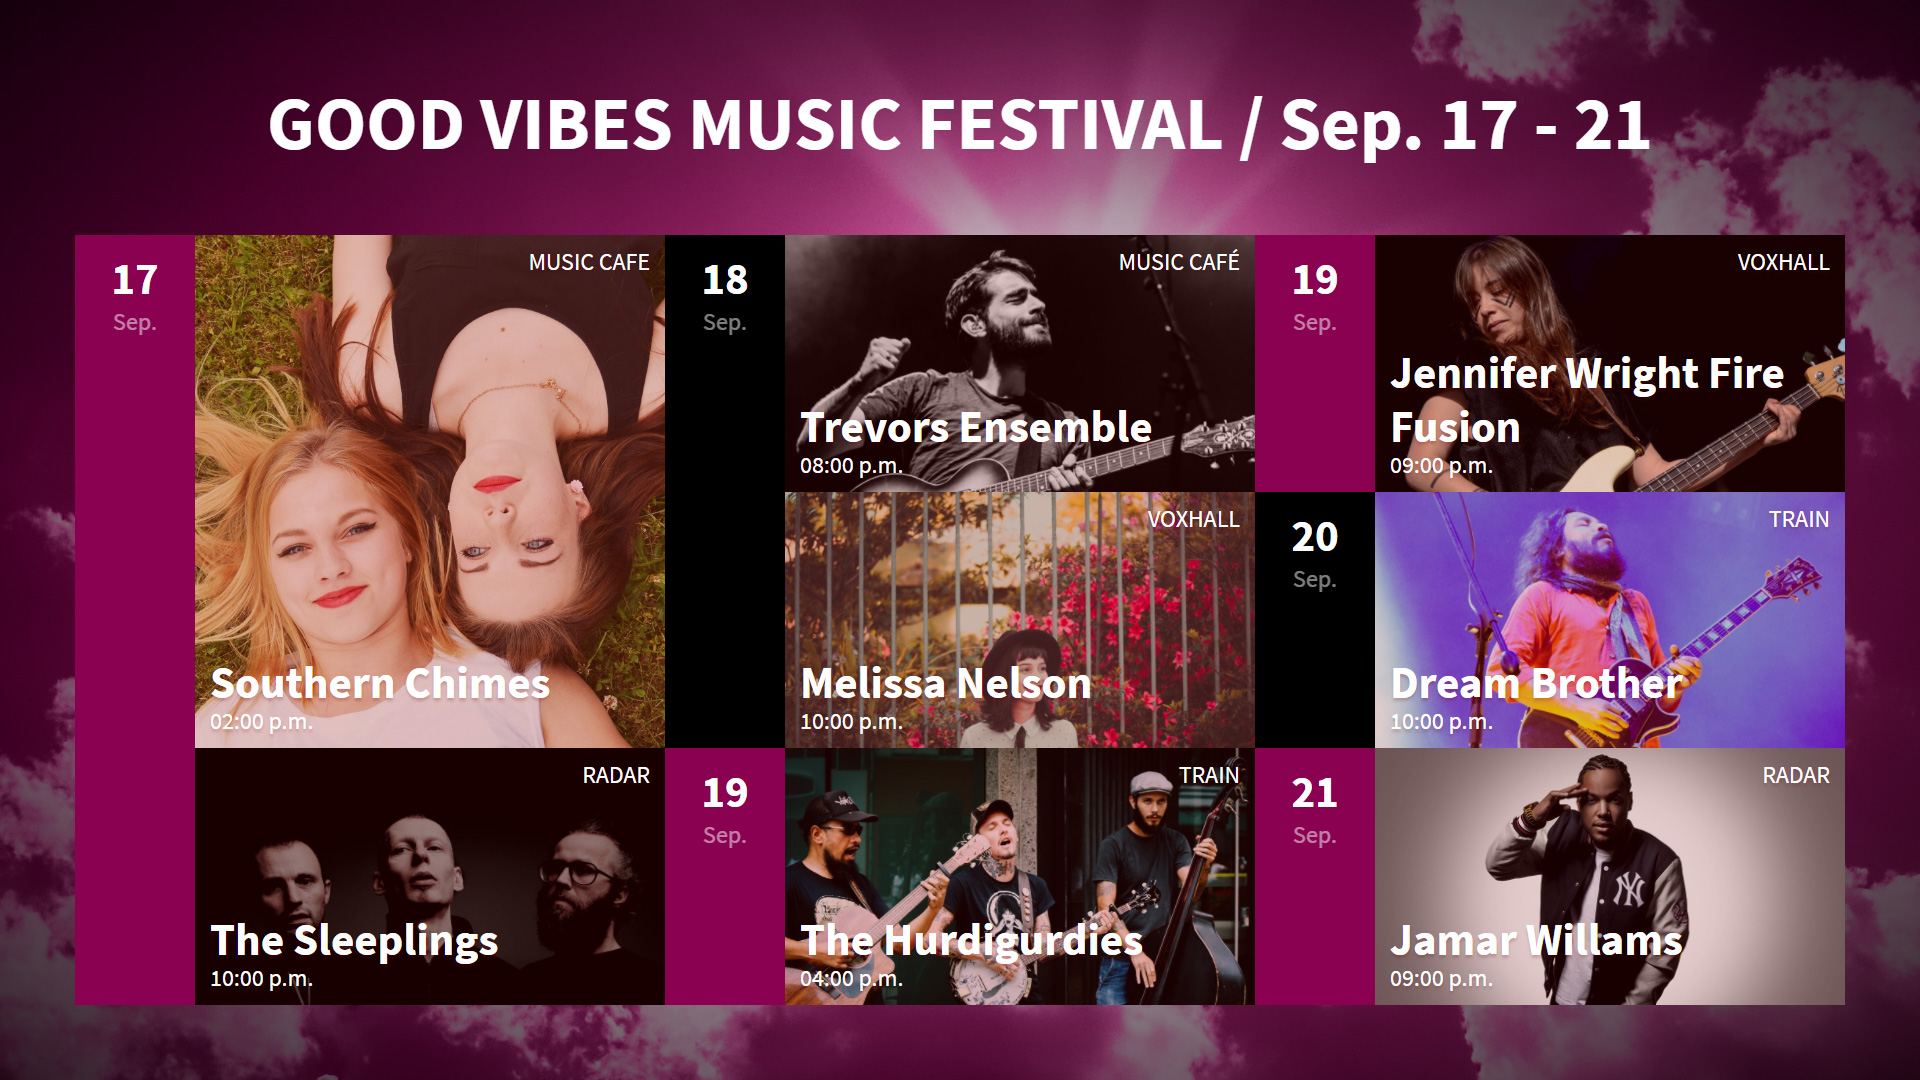
The "Flexical"-display-
5.3.1
Creating a Calendar
To create a Calendar presentation:
- Select Presentations from the options on the Main screen.
- Select + Add Presentation and choose "Calendar".
- If you have an integration to one or more external event feed sources, you will be able to select which feed you want data from.
- You will see the Edit screen. Under the Content tab, enter the Title (which will be displayed on screen) and optional Text (which is not displayed on screen).
- Select Save
- Set desired calendar limitations under the Calendar configuration tab.
Enable the Time limit checkbox to specify the maximum number of days the calendar will look into the future.
E.g. enter 30 to limit the calendar to look one month ahead.
To create a day-overview on +display / +idles, set this limit to 1, and choose the "Flexical" (Up to 28 events in one page) display under the Display tab. Hereby the calendar will only show events of the current day, and only hours will be shown. No dates.
Enable the Quantity Limit checkbox to specify how many events will be displayed.
E.g. if 10 is entered, the amount of active (not yet held) events in the presentation will never exceed 10.
Enable the Location limit checkbox to only show events for a selected location (i.e. local branch).
Use the drop down Location menu to select the location that you want to display the events for.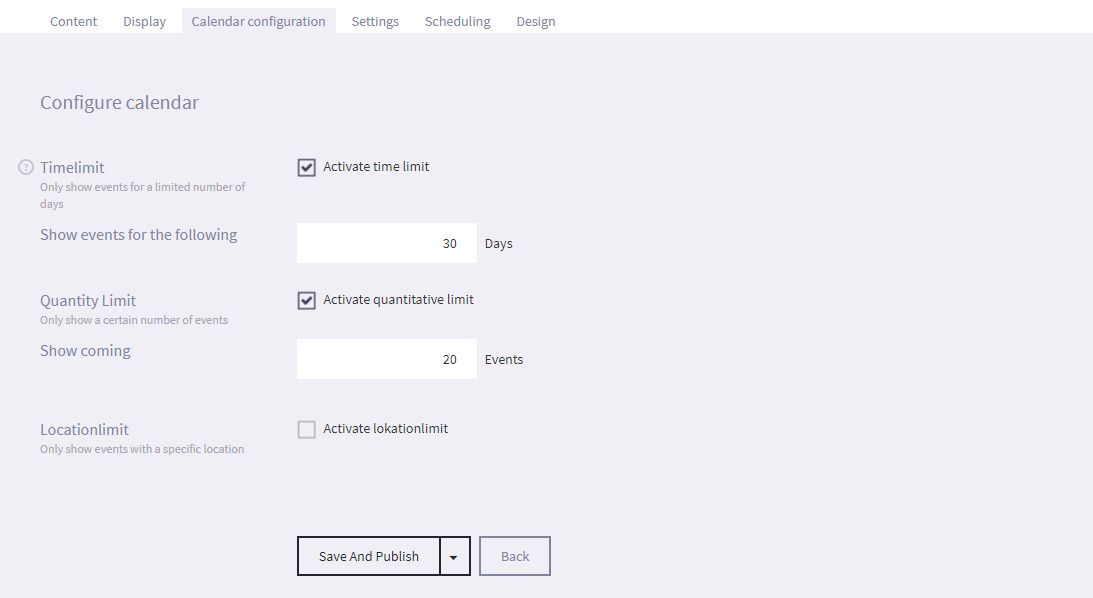
- Select Save
- Under the Design tab, select Choose File and navigate to an image on your computer to use the selected image as a Background for your Calendar.
- Select Save
- Select Presentations from the options on the Main screen.
-
5.3.2
Calendar display variants
A calendar presentation can be displayed in multible ways on both +activ and +display / +idle screens.
To select a display variant click the Display tab
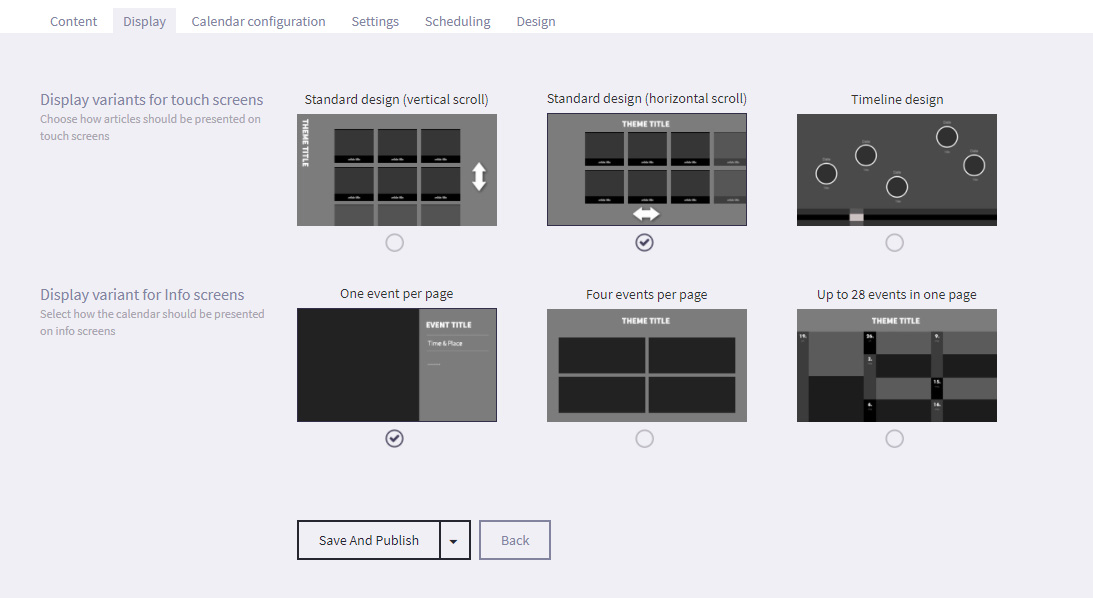
+activ display variants
- Standard design (vertical scroll)
As standard article collection. Rotated title placed in the left. - Standard design (horizontal scroll)
As standard article collection. Title placed in the top center. - Timeline design
Places events on chronological timeline. Events with same dates are placed in the same button.
+display and +idle display variants
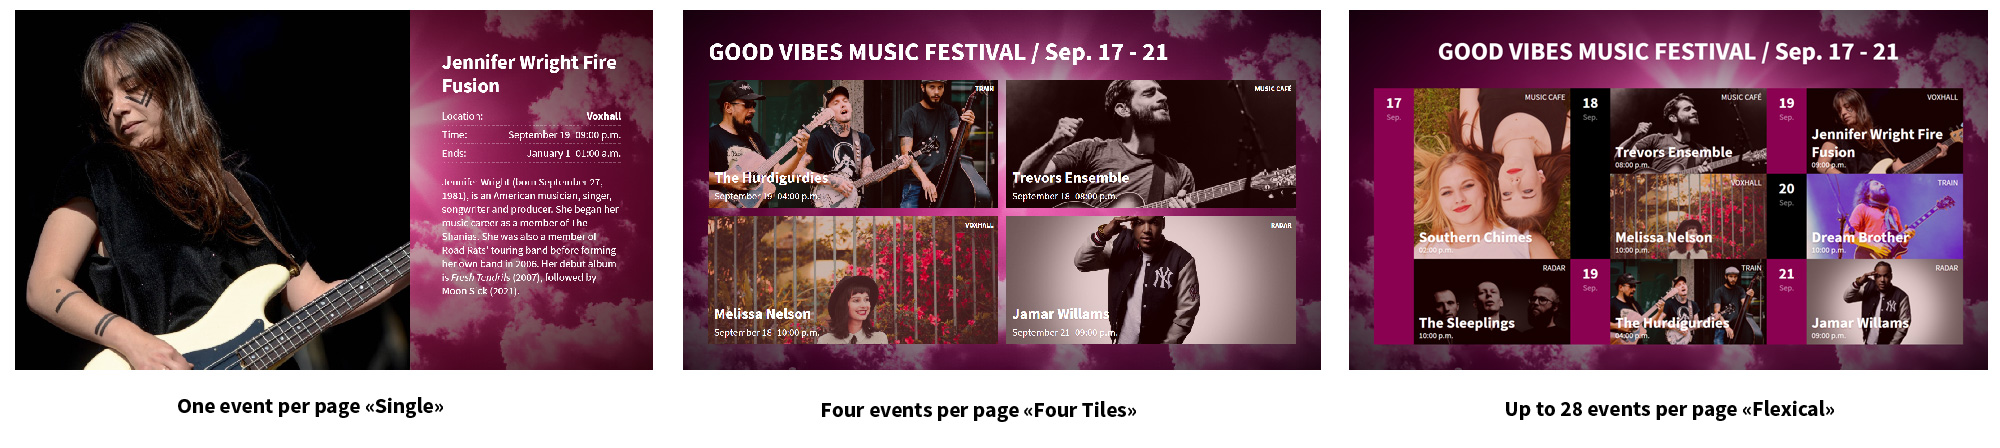
- Single:
One event per page. Presenting the full article content. Looping through all events by multiple pages - Four Tiles:
Four events per page. Looping through all events by multiple pages - "Flexical" - NEW*
Up to 28 events per page. One page only. If calendar counts more than 28 events, the rest are not displayed
Tip: To create a "todays events" +display page
(This requires that the events are coming from an external provider)
1. Choose "flexical" display variant
2. Goto the Settings tab and select Show events for the following 1 day - Standard design (vertical scroll)
-
5.4
Timeline
(+activs only)
A Timeline is a presentation that shows the events of a specific time period. Articles and Timeline text are displayed on the time line at specific dates, and the timeline automatically scrolls to depict the passage of time. Patrons can manually scroll along the timeline and touch article icons to view the article in full.
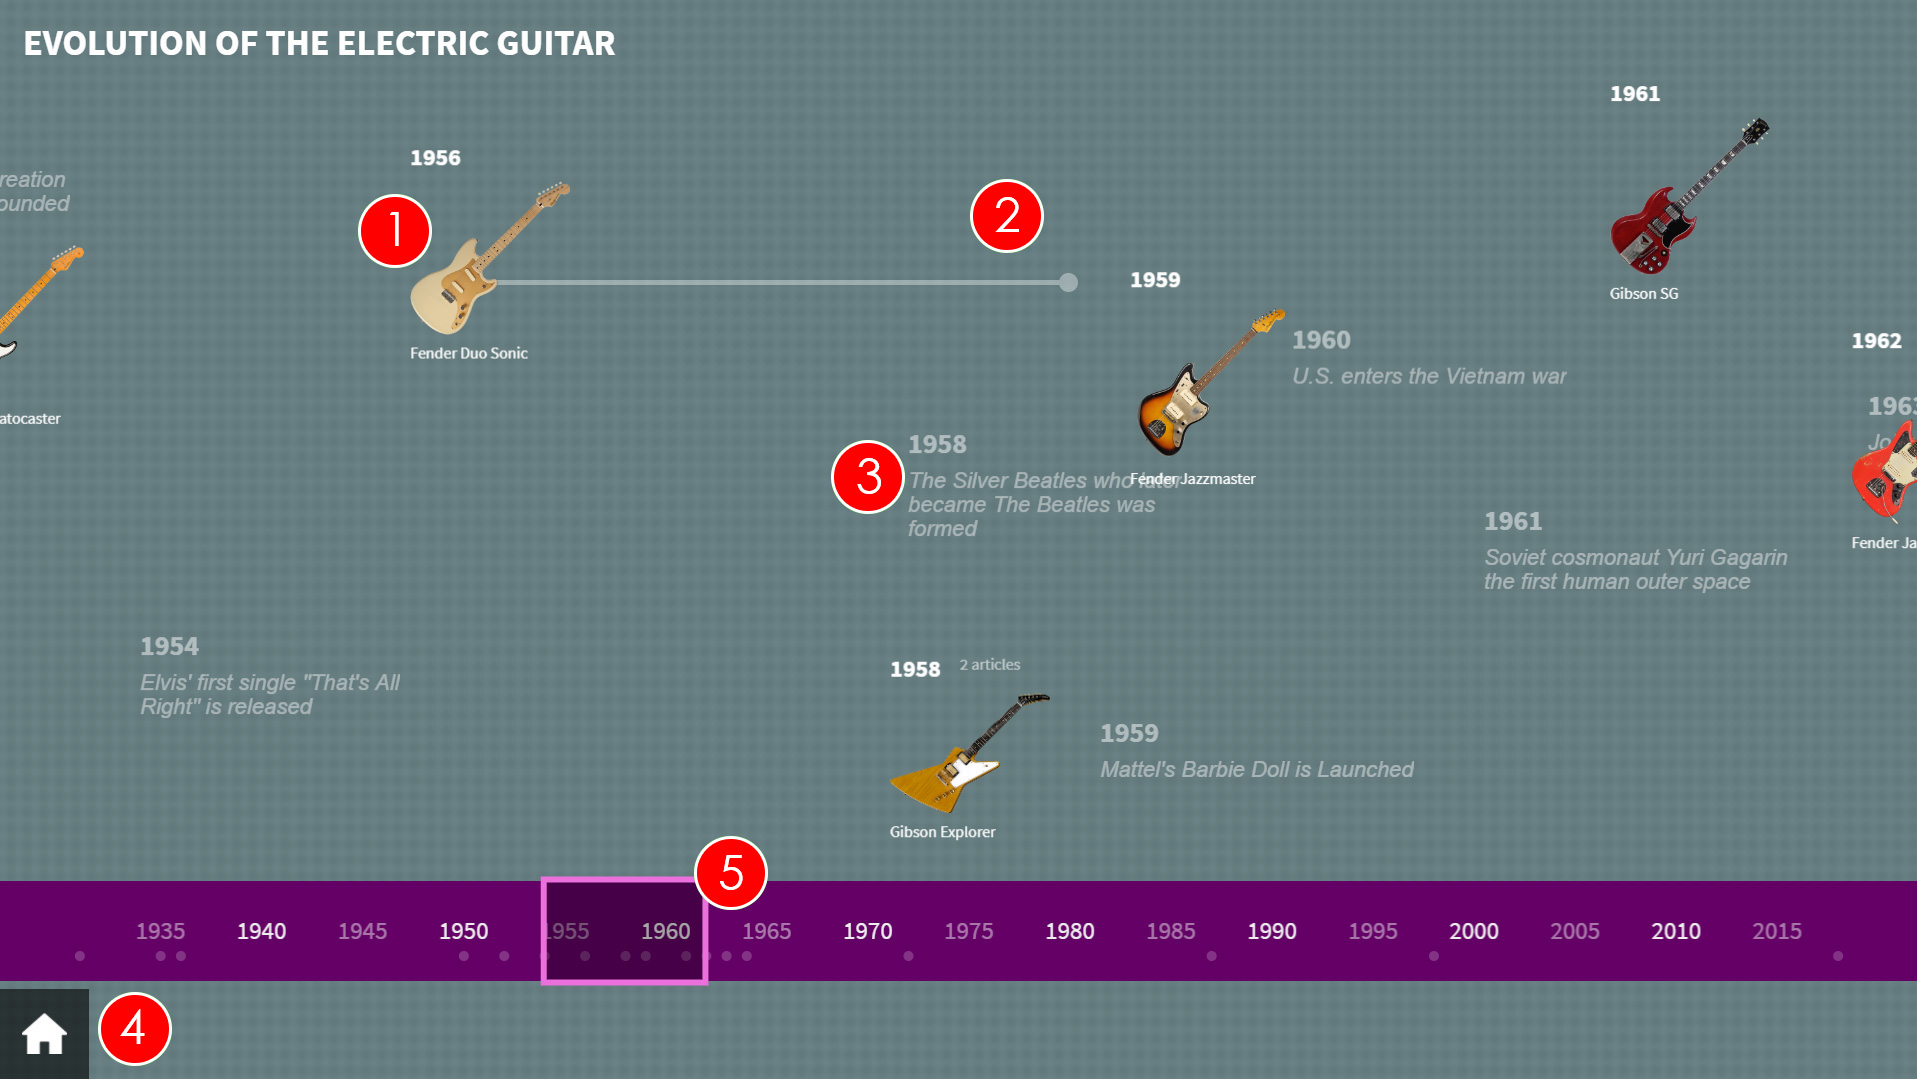
- Article Image - This is the image for the article. If pressed, the full article will be displayed. The example above uses icon images, which are uploaded in the timeline tab of the article. These are great for images with transparency.
- Article duration - If you set the article's End Year to a later year than Start Year, you will see a line from the article button that starts at the Start Year for the article and ends at the End Year.
- Timeline Text - Any Timeline text that has been assigned to the timeline will be displayed. It will appear at the configured year.
- Home - Selecting the Home icon will take the patron back to the main screen, where they can pick between the root content items of the uniFi+activ.
- Timeline - The timeline automatically scrolls from the earliest year on the timeline to the latest year on the time. Patrons can manually scroll the timeline in either direction.
-
5.4.1
Creating a "Timeline"
To create a basic timeline presentation (Title, Background image, linked Articles and timeline text):
- Select Presentations from the options on the Main menu
- Select + Add Presentation and choose the TimeLine presentation.
- You will see the Edit screen. Under the Content tab, enter the Title (which will be displayed on screen) and optional Text (which is not displayed on screen)
- Select Save and Publish (or Save as draft if presentation is not ready to publish).
- Select the + Choose Articles to link articles to the Timeline.
- The articles must have at least a Start year set in the Edit Article > Timeline tab settings, and an End year if the time period relating to the article is over several years (e.g. the life of Julius Caesar - 100 BC to 44 BC).
- Under the Timeline tab, use the Timeline objects drop down menu to select how the buttons that link to the articles appear on the timeline.
- Either set the Start year and End year you want for the specific timeline, or select Automatic after articles to automatically create a timeline based on the dates attributed to the articles.
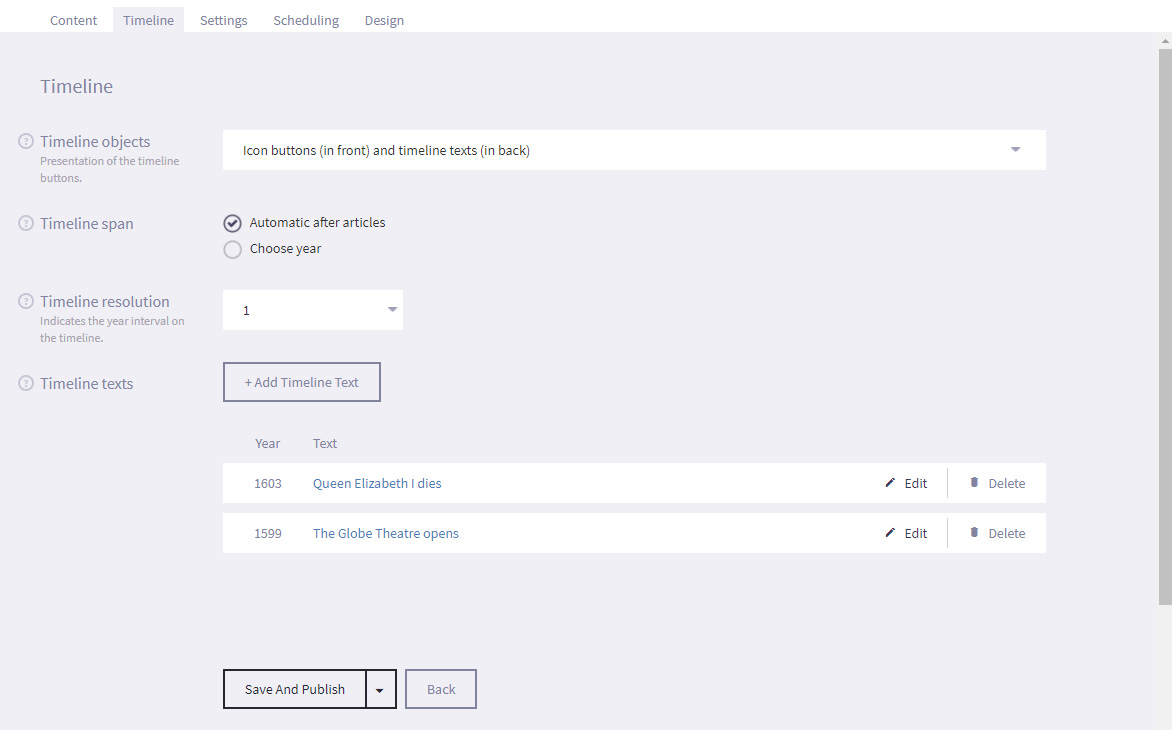
- Use the Timeline resolution drop down menu to select the frequency that the length of time on the timeline is displayed in. For example, a timeline spanning 1000 years could have a resolution of 50 years to reduce the need for scrolling back and forth.
- Timeline texts is a list of texts to support or add perspective to the timeline presentation. Each text are attached to a year and will be displayed as flat text (not interactive) on the timeline.
- Under the Settings tab, you can assign tags to presentation so that it is easier to search for later. For example, if the presentation is part of your Roman collection, you can enter a tag such as Rome on all articles and presentations that should be included, or you could also enter a tag such as Julius Caesar so that you can quickly search for a specific subject. You can add multiple tags to a presentation or article.
- Under the Scheduling tab, you can set a time limit for the specific dates and times that the presentation will be displayed by selecting Active time limit and entering the required Start and End dates and times.
- Under the Design tab, select Choose File and navigate to an image on your computer to use the selected image as a Background for your timeline.
If you are using multiple timeline presentations to create one long timeline, consider creating one large image and dividing it in to smaller images (one for each timeline). This way, it will look like the continuation of one timeline. - Select Save.
- Select Presentations from the options on the Main menu
-
5.5
Map
(+activs only)
A Map is a presentation that attaches articles to different points on an image of a map. Patrons can select the image icon for the article to view the article in full.
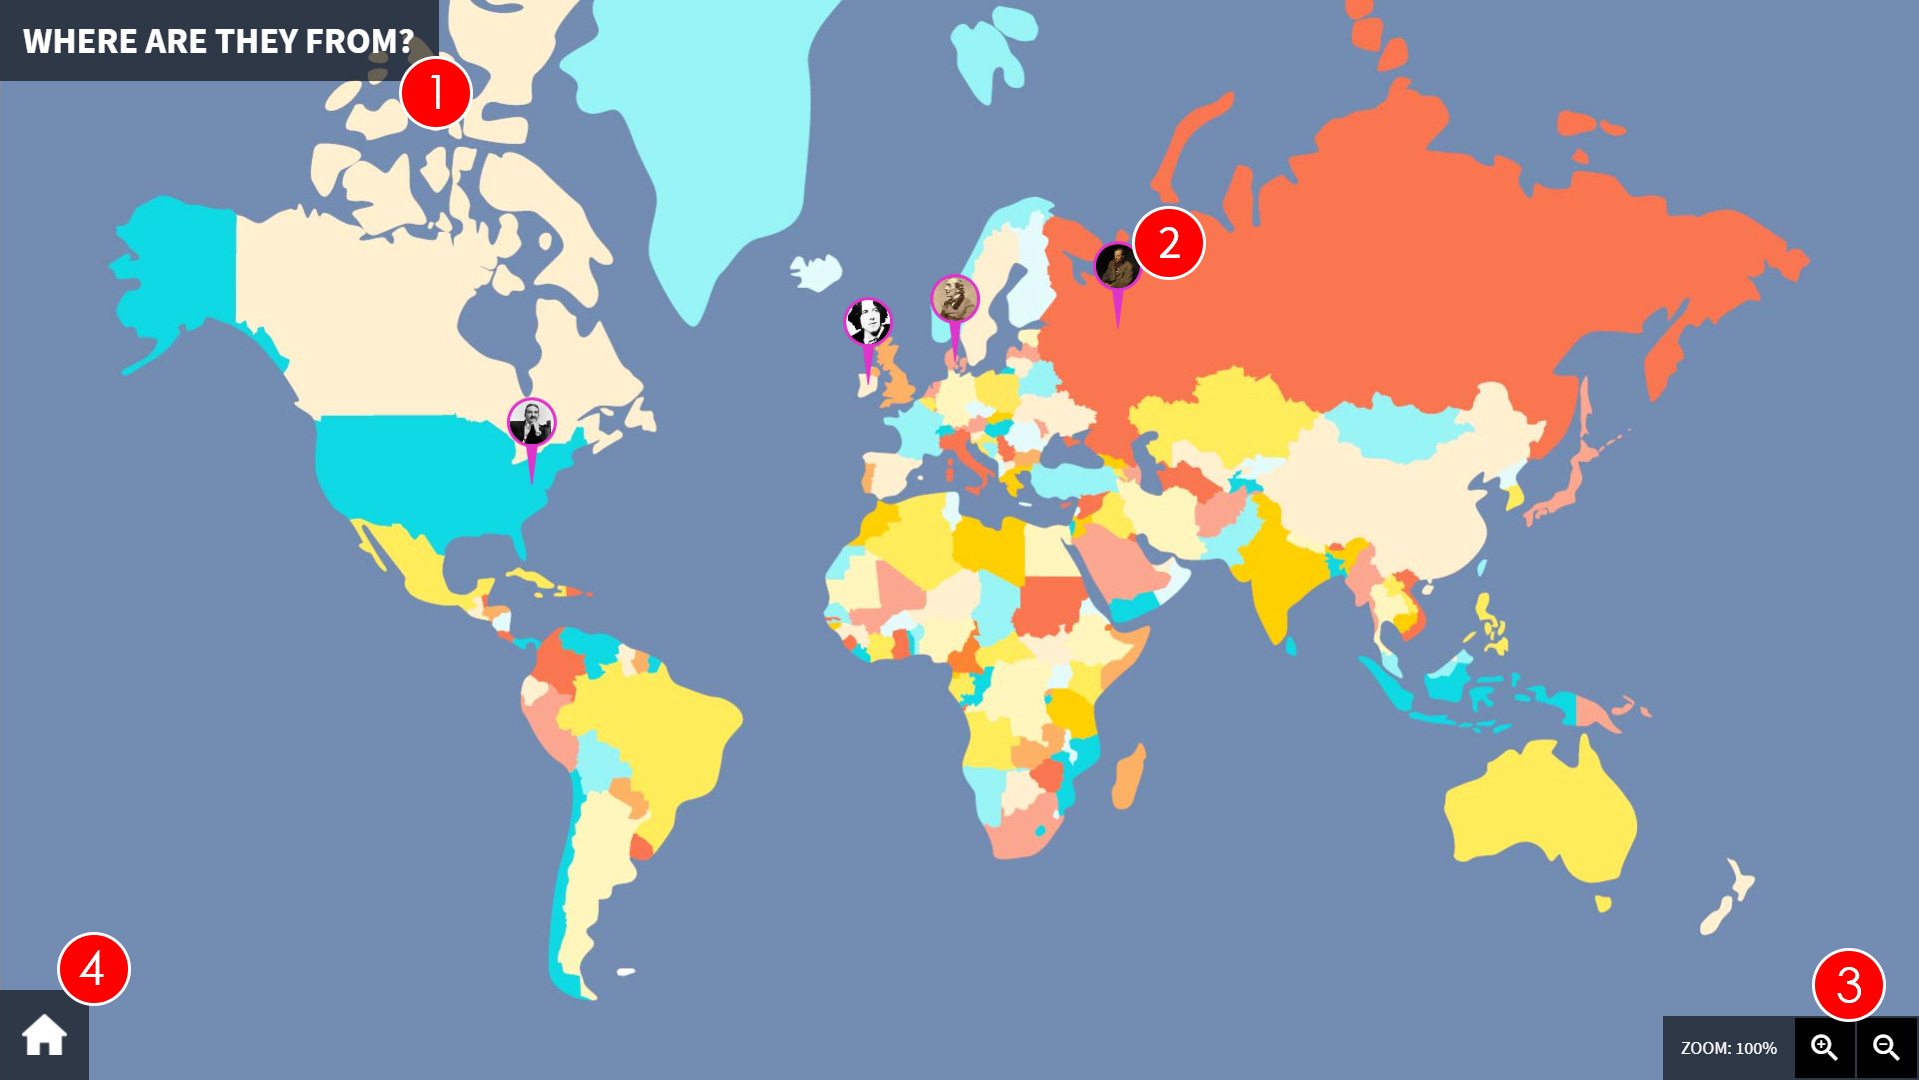
- Presentation Title - This is the title of the presentation.
- Article Image - This is the image that is associated to the article. The image needs to relate to the subject of the article and be placed at the relevant point on the map. For example a picture of The Colosseum would indicate an article either about the building itself or possibly Rome in general, and would be located where Rome is on the map.
- Zoom - Patrons can use the "+" and "-" buttons to zoom in and out of the image. This is especially useful if a certain area of the map has a large number of articles in close proximity.
- Home - Selecting the Home icon will take the patron back to the main screen, where they can pick between the root items attached to the uniFi+activ.
-
5.5.1
Creating a "Map"
To create a basic map presentation (Title, Text, background image and linked Articles):
- Select Presentations from the options on the Main menu
- Select + Add Presentation and choose the Map presentation.
- Under the Content tab, enter the Title and Text.
- Select Choose File and browse to the location of image you want to use as your map. This is the image that the articles will be attached to so it should be a good quality image.
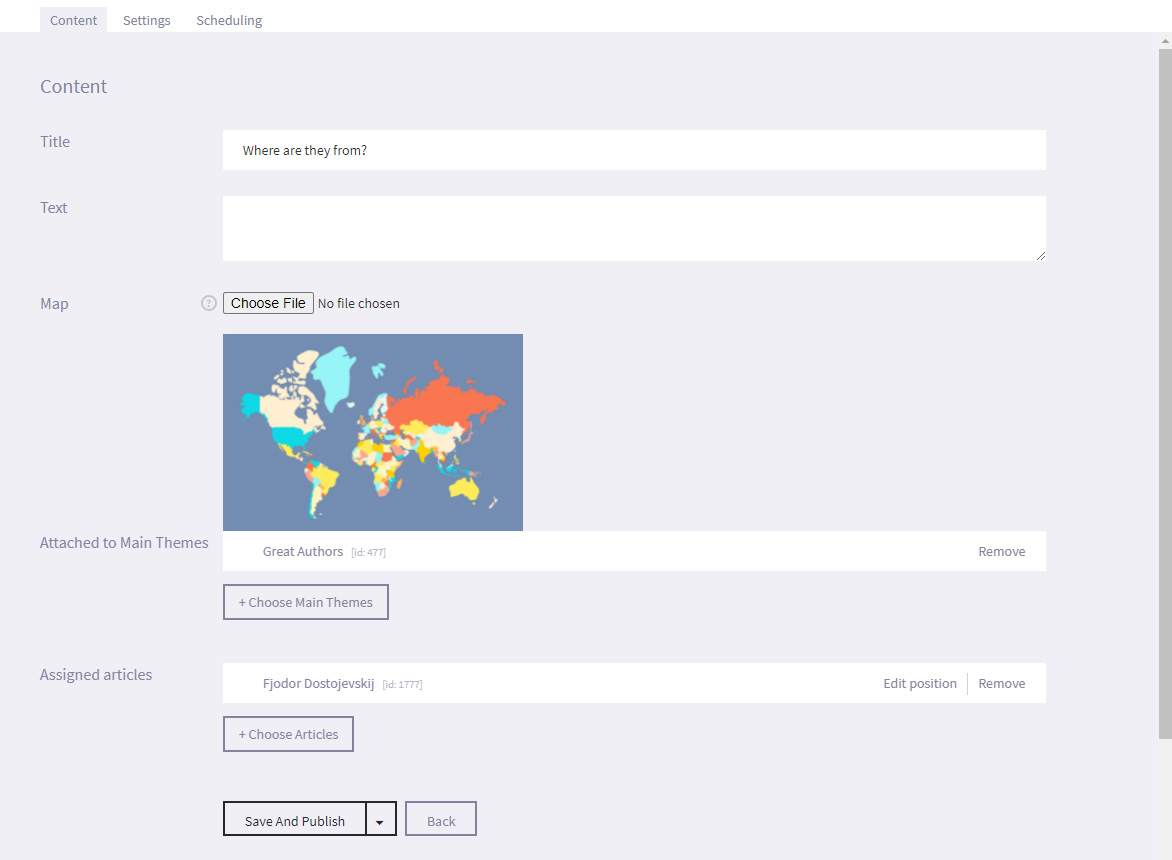
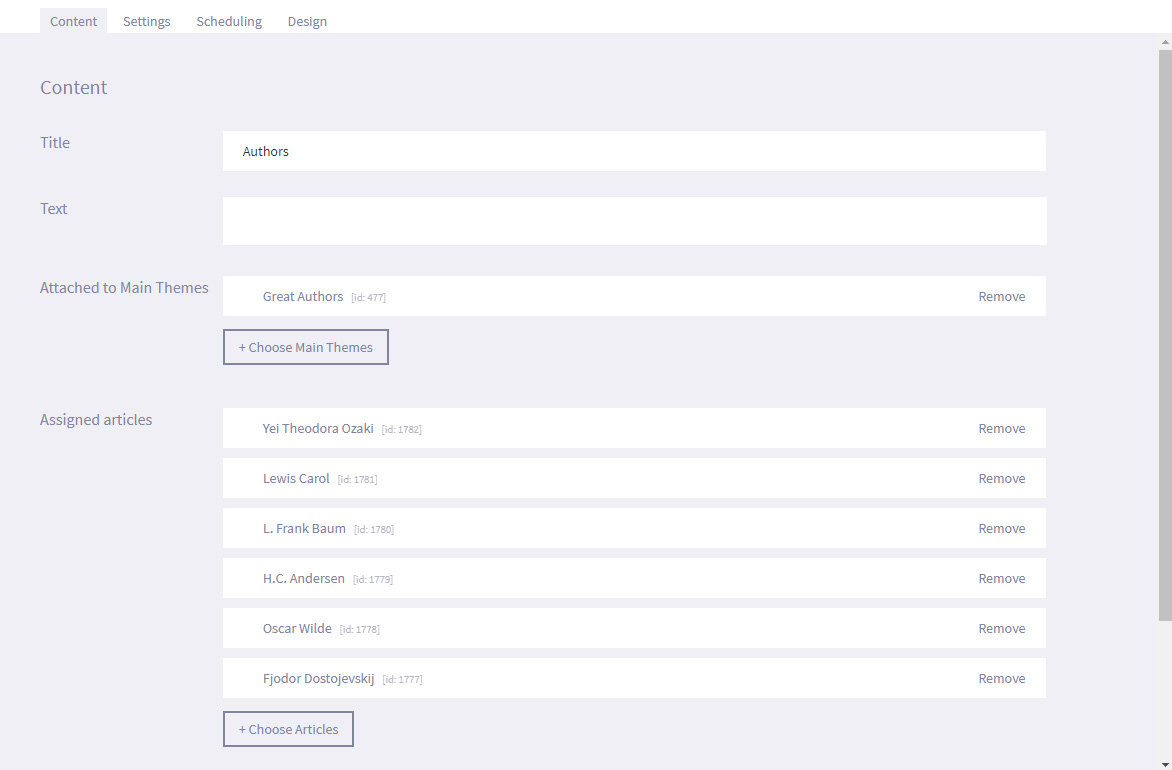
- Select the + Choose Articles and link the required articles to the Map.
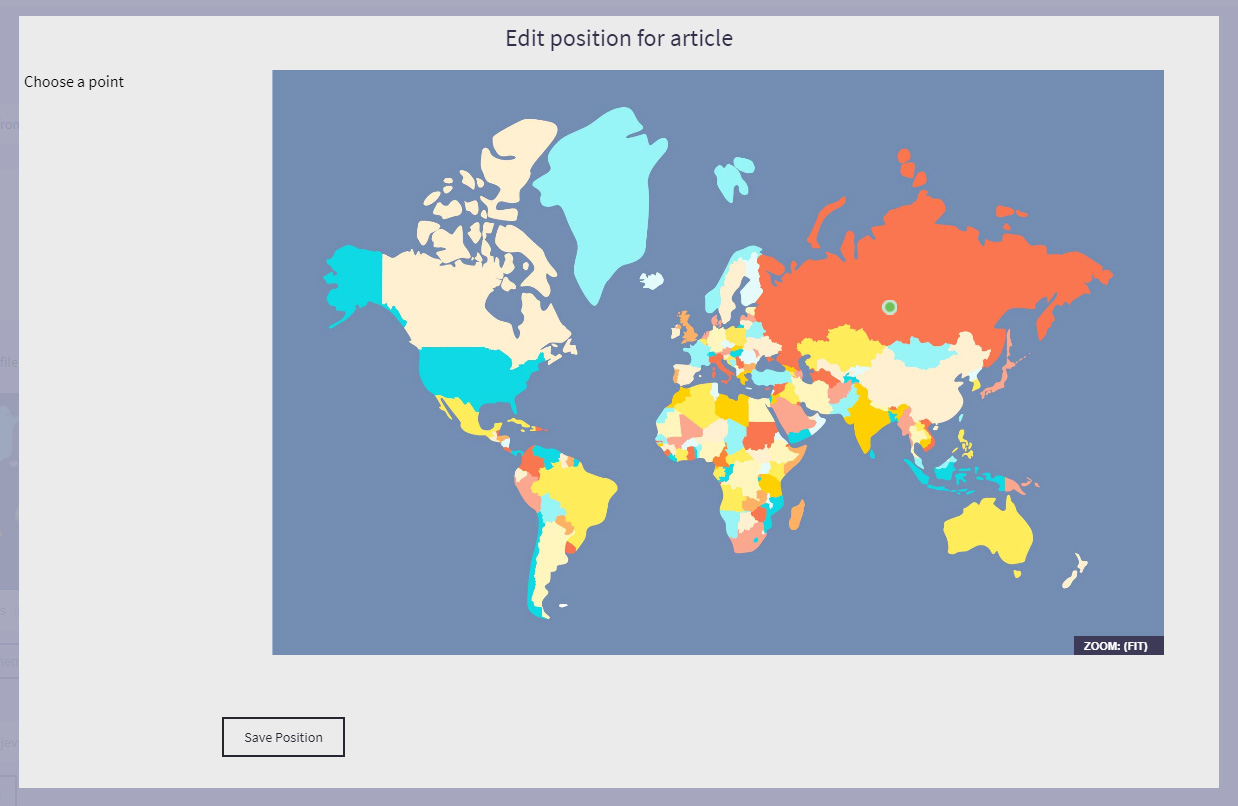
- Select Edit Position next to each required article.
- Select a point on the map where you want the image icon for the chosen article to be displayed. The position is displayed as a green dot. Select Save Position.
- Under the Settings tab, you can assign tags to presentation so that it is easier to search for later. For example, if the presentation is part of your Roman collection, you can enter a tag such as Rome on all articles and presentations that should be included, or you could also enter a tag such as Julius Caesar so that you can quickly search for a specific subject. You can add multiple tags to a presentation, widget or article.
- Under the Scheduling tab, you can set a time limit for the specific dates and times that the presentation will be displayed by selecting Active time limit and entering the required Start and End dates and times.
- Select Save
- Select Presentations from the options on the Main menu
-
5.6
ABC line
(+activs only)
The ABC line presentation is used to display articles in alphabetical order on a scrollable line (similar to using a timeline to display articles based on dates).
Patrons can manually scroll along the ABC line and touch article icons to view the article in full.
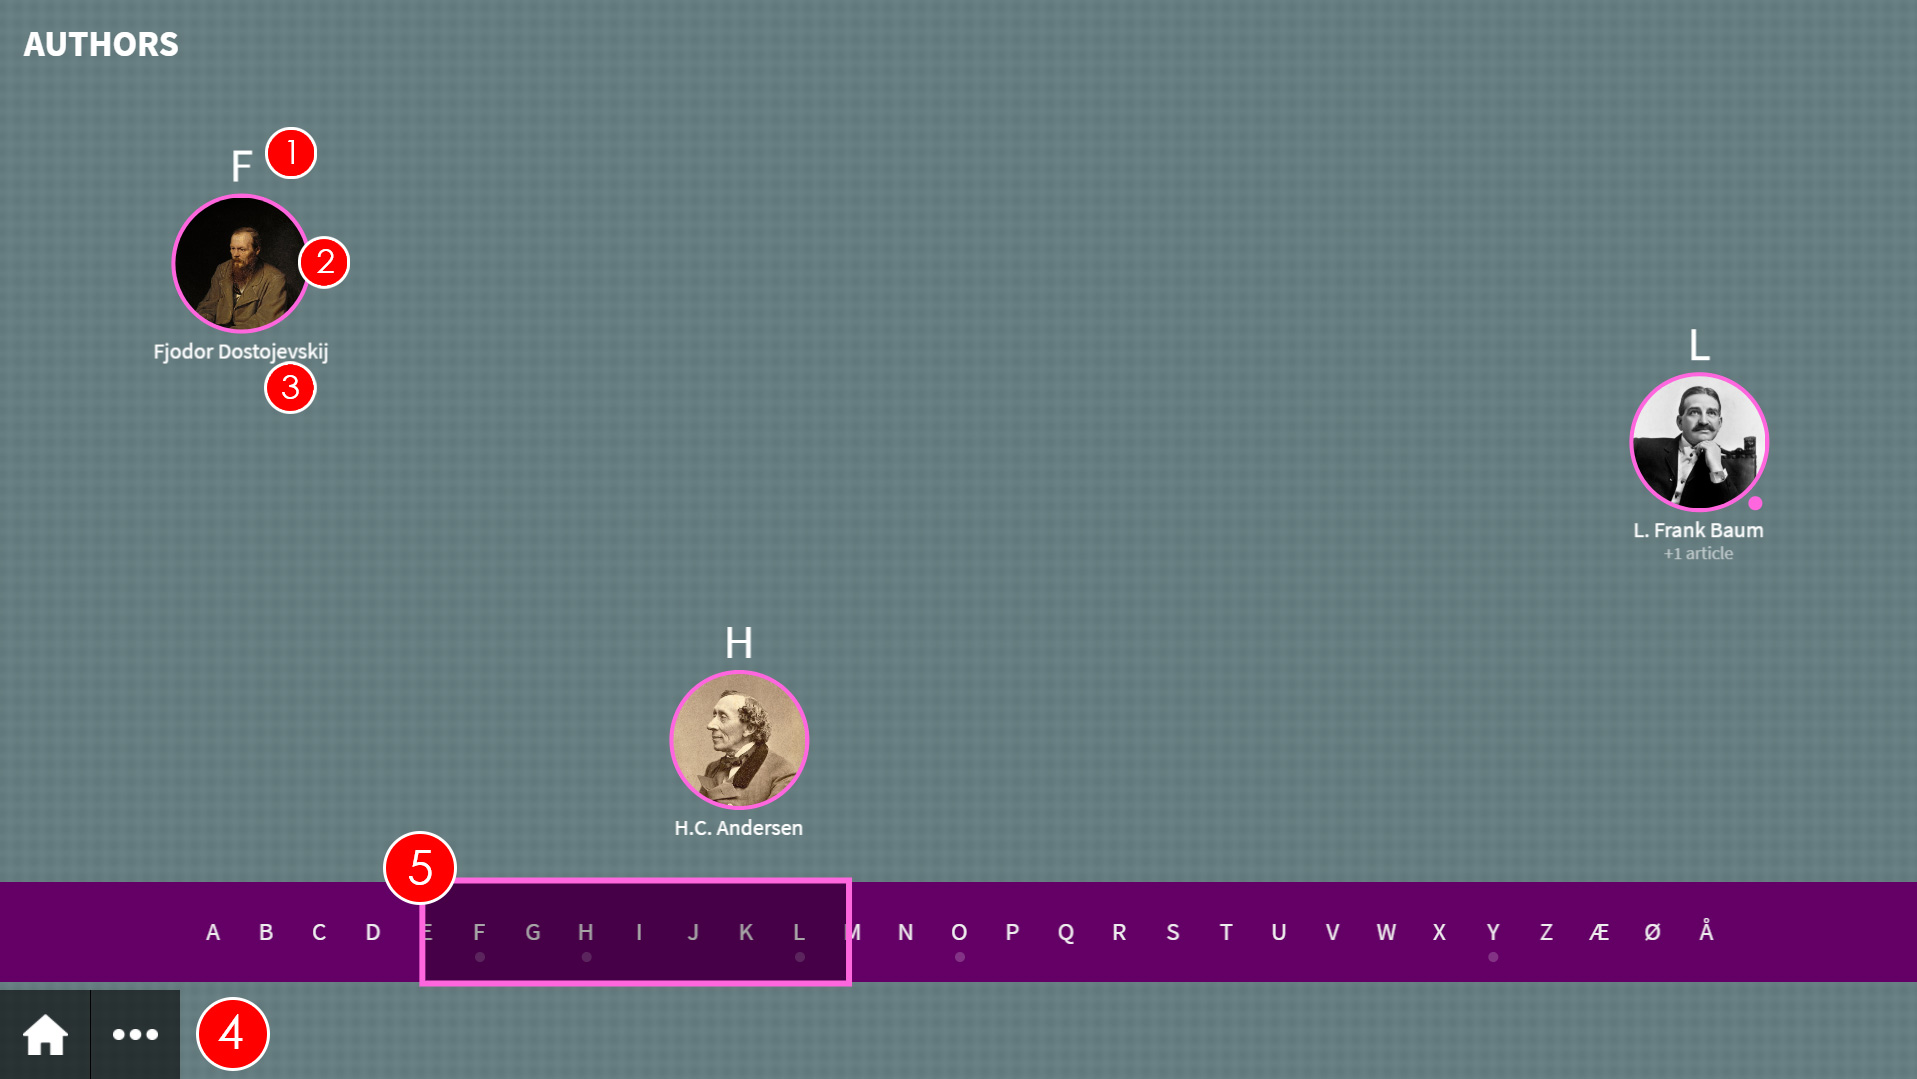
- Categorising letter - The letter that is used to place the article at a position on the ABC line. The categorising letter can either be the first letter of the article title or another specified letter. For example, if you have multiple articles that start with the word "The" (which would all appear under T by default), you may wish to set the first letter in the second word to be the categorising letter.
- Icon - The icon is an image that has been associated with the article that appears on the ABC line to show the articles position. If there is more than one article for a specific letter, the icon will cycle through the images for all associated articles.
- Title - The title of the article. If there is more than one article for a specific letter, the title will cycle through the titles for all associated articles, and you will see text below the title showing how many additional articles are associated.
- Home / Siblings - Selecting the Home icon will take the patron back to the main screen, where they can pick between the root items attached to the uniFi+activ. The (...) button vil open a selection of sibling presentations/widgets attached to the same collection.
- ABC line - The ABC line runs from A to Z (with the inclusion of some special characters at the end). The patron can press anywhere on the ABC line or scroll it to see the articles associated with the letters in that part of the line.
-
5.6.1
Creating an "ABC line"
To create an ABC-line presentation:
- Select Presentations from the options on the Main screen.
- Select + Add Presentation and choose the ABC line presentation.
- Under the Content tab, enter the Title of the presentation and Text. These are not displayed on screen.
- Select Save and Publish (or Save as draft if the presentation is not ready to publish).
- Select the + Choose Articles to link articles to the ABC line.
- Under the Settings tab, you can assign tags to presentation so that it is easier to search for later. For example, if the presentation is part of your Roman collection, you can enter a tag such as Rome on all articles and presentations that should be included, or you could also enter a tag such as Julius Caesar so that you can quickly search for a specific subject. You can add multiple tags to a presentation or article.
- Under the Design tab, select Choose File and navigate to an image on your computer to use the selected image as a Background for your timeline.
If you are using multiple timeline presentations to create one long timeline, consider creating one large image and dividing it in to smaller images (one for each timeline). This way, it will look like the continuation of one timeline. - Select Save
- Select Presentations from the options on the Main screen.
- Basic