Internal Manual index
-
1.
The System Overview
-
1.1
uniFi Server
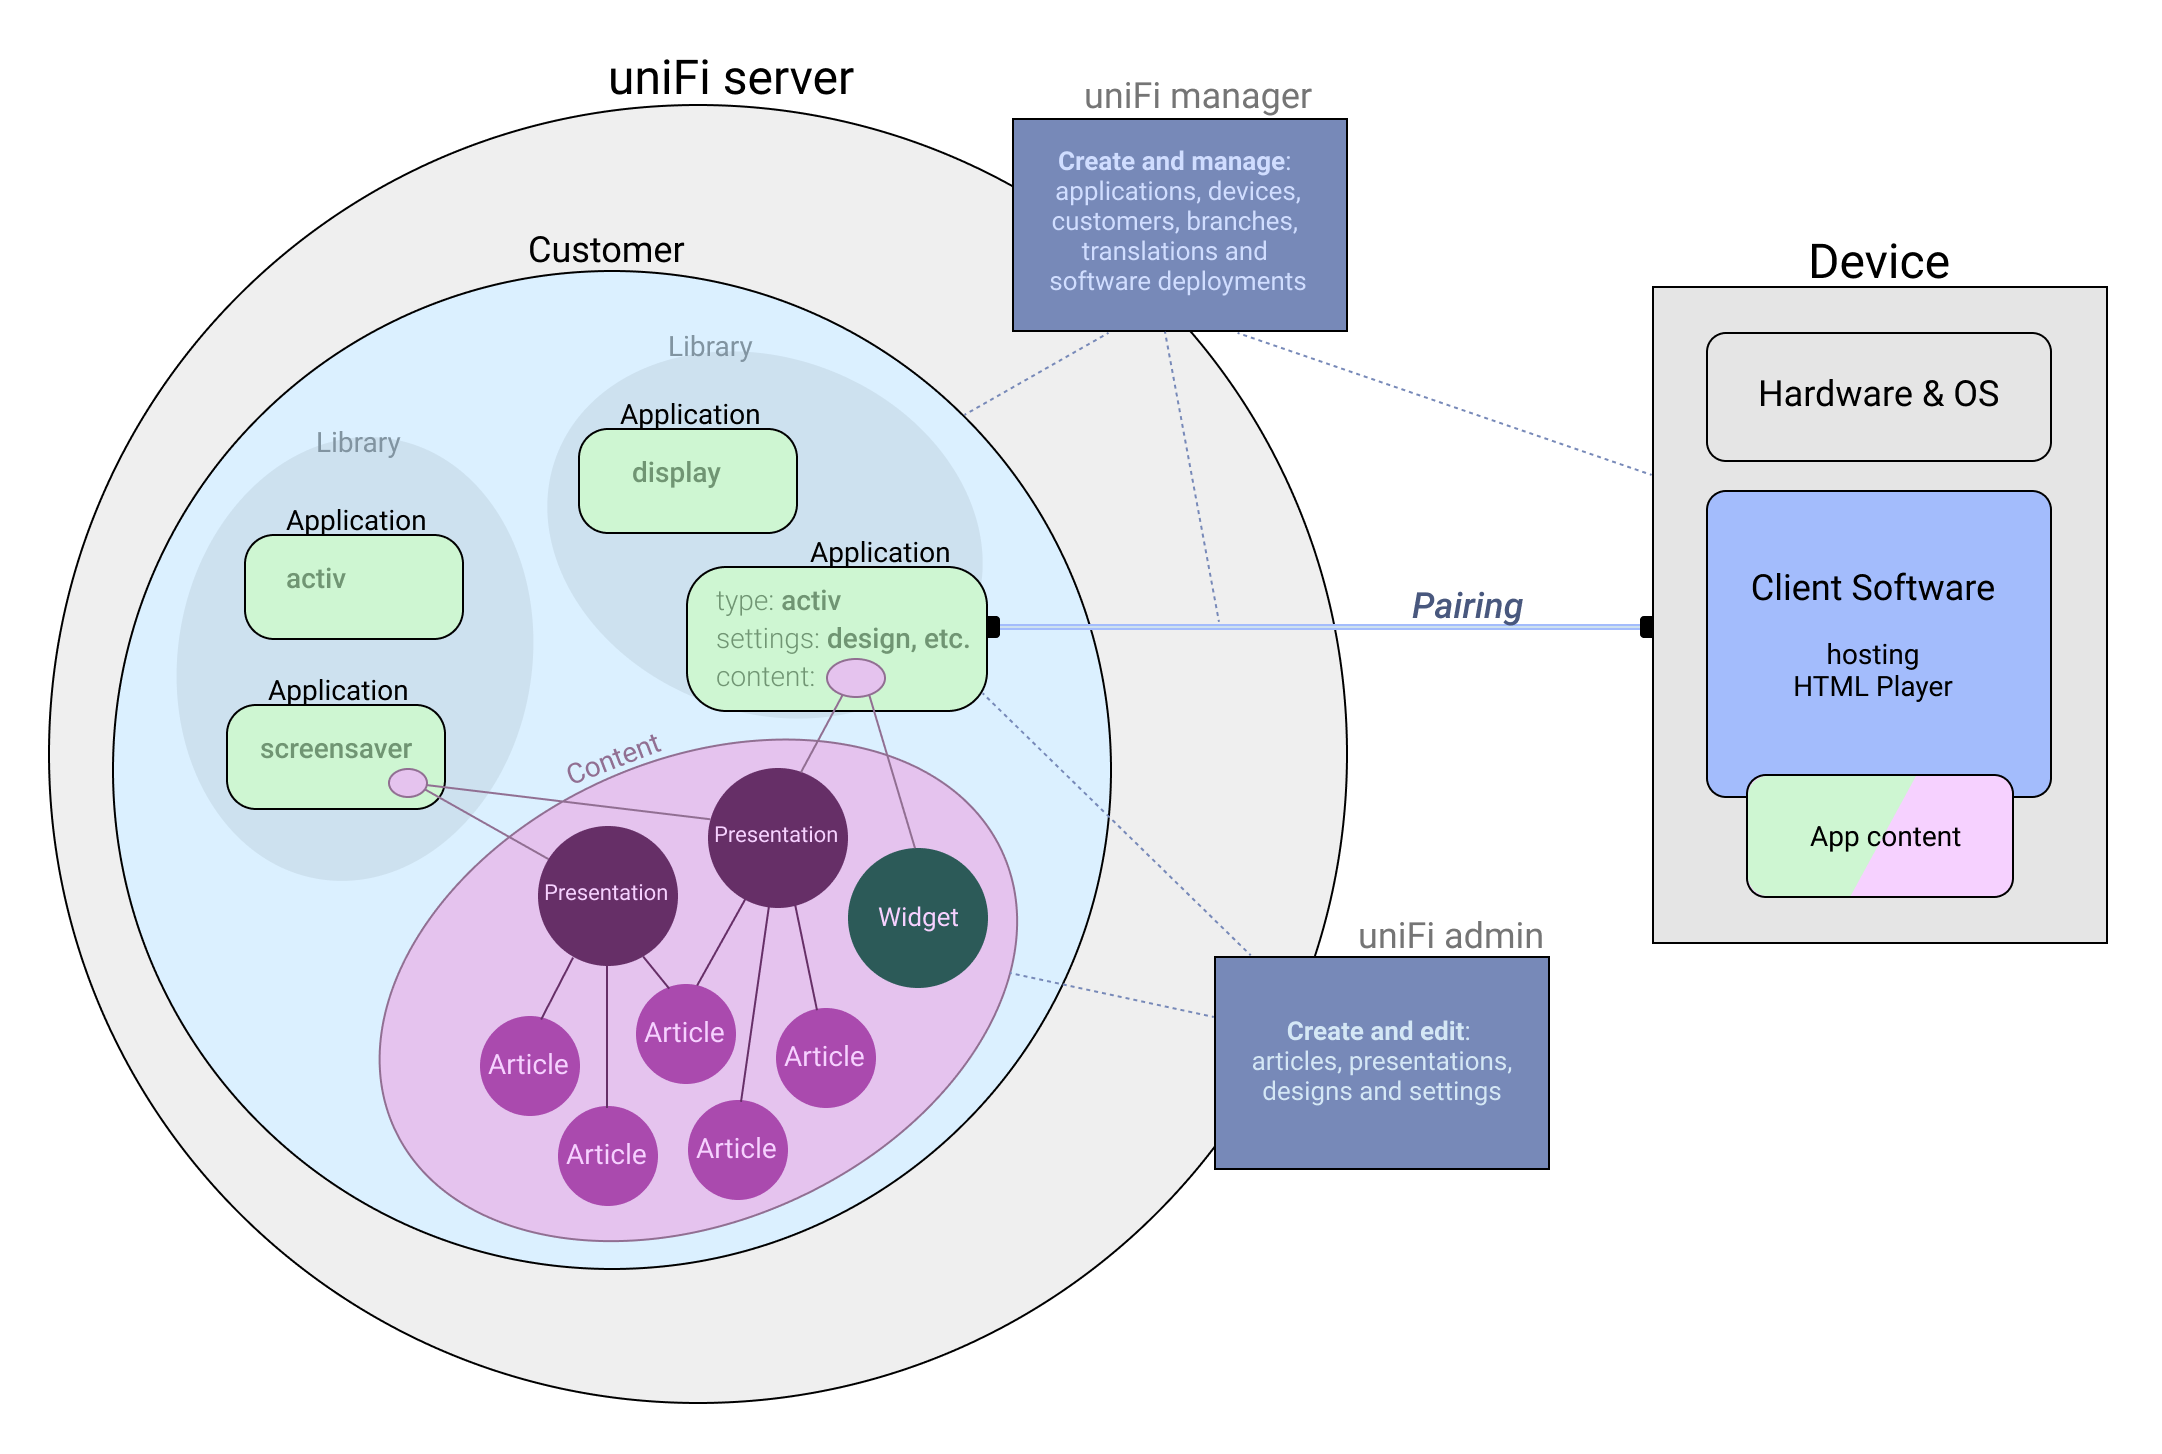
The uniFi server has multiple functions:
- It holds all content created by authors or library staff.
- It holds all data about customers, applications and devices managed by Bibliotheca technicians and developers.
- It hosts the content management sites: uniFi admin (authors/library staff) and uniFi manager (Bibliotheca techs)
- It serves application content to all devices located in the Libraries via the API
-
1.1.1
Application
Today an application can be one of three different types: touchWall, infoWall or screenSaver.
An application can be regarded as a unique container of content with specific display settings, all compliant with the type of the application.
Applications are created in the uniFi manager, where they are mapped to a Customer and a Library (branch). Furthermore the application can be paired with a device - a piece of physical hardware (PC) located at the customer (or at bibliotheca for testing).
Applications that are not paired with a device are called virtual applications. These are mostly used for development and testing, but they are also handy for demonstrating anything from a single feature to a fullblown application to new customers, before they buy.
When an application has been created, the customer can see it in the Screens section of uniFi admin site, and they can now add content (themes, articles) to it, and change its design. If it is paired with a device which is connected to the internet, the admin user can moreover push the newest application content out on the physical screen of the device. More here.
-
1.1.2
Content
Content on the uniFi+ server refers to raw author created content such as articles and themes. A theme is basically a collection of articles, and each type of theme will display its articles in its own specialized way. Contents are created in the Admin site - a manual on Admin is found at the user-faced helpsite here: http://help.transformativelibrary.com/
-
1.2
Device
A device is a term that unifies a piece of hardware including its OS, the transformativeLibrary software installed, and the content used by the uniFi software. Basically it is a PC of any type or provider located at the Library. The installed software will fetch and show the attached content on the screen connected to the device.
-
1.2.1
Hardware
Hardware types supplied by bibliotheca:
- Intel NUC (touchWalls) https://www.intel.com/content/www/us/en/products/boards-kits/nuc.html
- Intel Stick PC (infoWalls) https://www.intel.com/content/www/us/en/products/boards-kits/compute-stick.html
Legacy hardware types we no longer supply:
- Intel BRIX (touchWalls and infoWalls) https://www.gigabyte.com/Mini-PcBarebone
Furthermore the screenSaver can be installed on any bibliotheca-provided kiosk.
Customers are allowed to provide their own hardware, as long as it meets the minimum requirements:
- Windows 7 or later installed
- i5 processor
- 8Gb RAM
- 20Gb free harddisk space (could be more, depending on how much media content the customer plans to display on the screen)
-
1.2.2
Software
On the device we install the software that does the following:
- Checking its device state from the cloud - is it paired with an application, and is thus allowed to start?
- Downloads the application content from uniFi Server. The content is physically stored in a folder on the device. This procedure ensures the content is available even in case of network issues.
- Displays the content interface on screen.
- By every restart of the software (usually every morning) it looks for content updates and downloads it to the content folder. If any "old" content is locally available this is shown until the new content has been fully downloaded and is ready to display.
- It is also at restart the software checks for any new software version available
- Continuously listening to commands given from uniFi Manager or Admin site (e.g. Update Content, or Restart Computer).
-
1.2.3
Application content
Content - downloaded to the device - is a combined bundle of application settings and design, and the content (themes, articles and media) attached to the given application on the uniFi server.
-
1.2.1
-
1.1
-
2.
uniFi Manager introduction
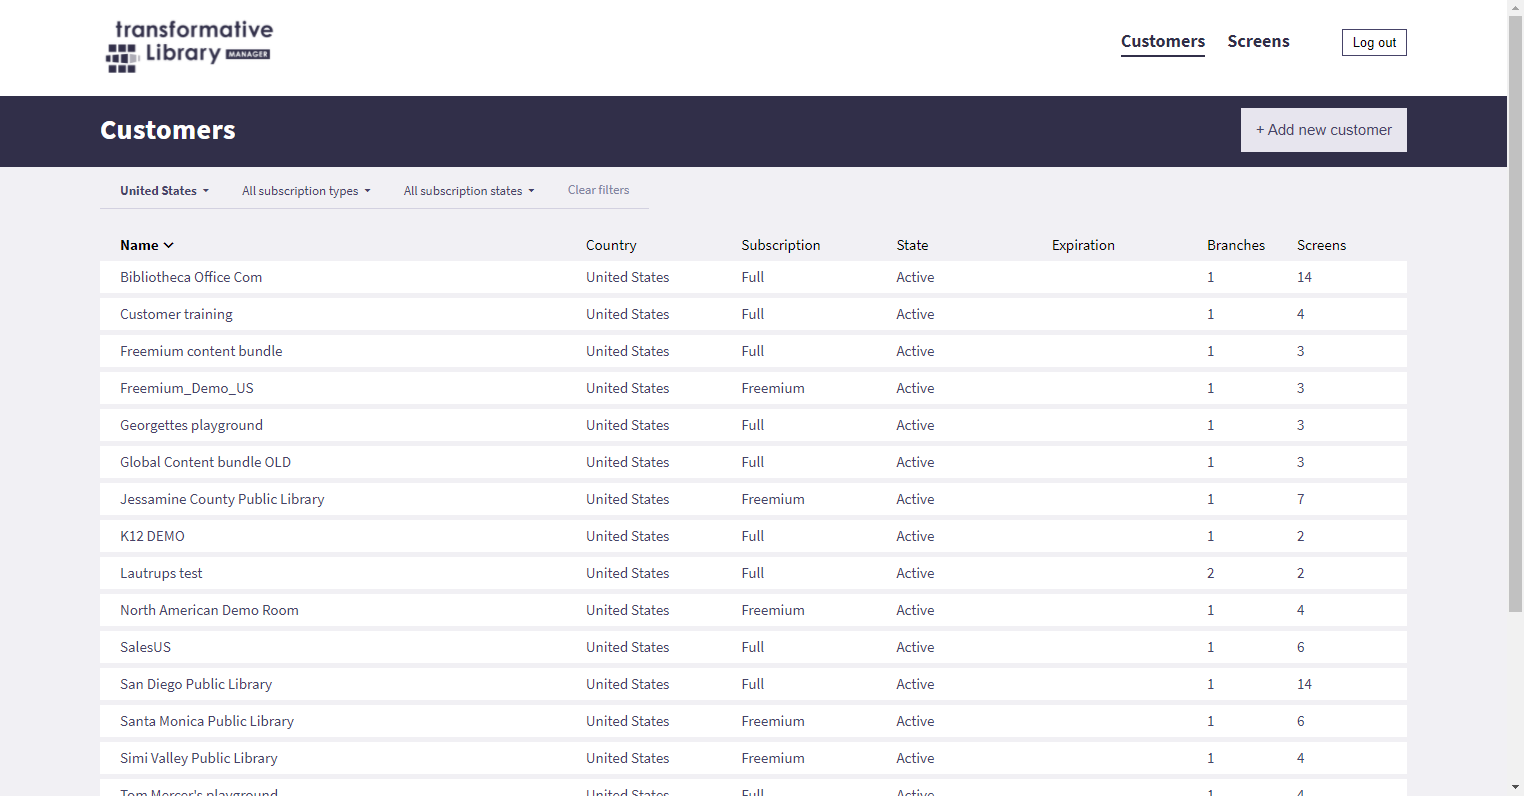
The TL Manager is a tool only for bibliotheca technicians and developers.
As a tech user you have two sections available: Customers and Screens.
-
2.1
Customers section
The customer sections is a list of current customers.
Click any row to edit the customers settings.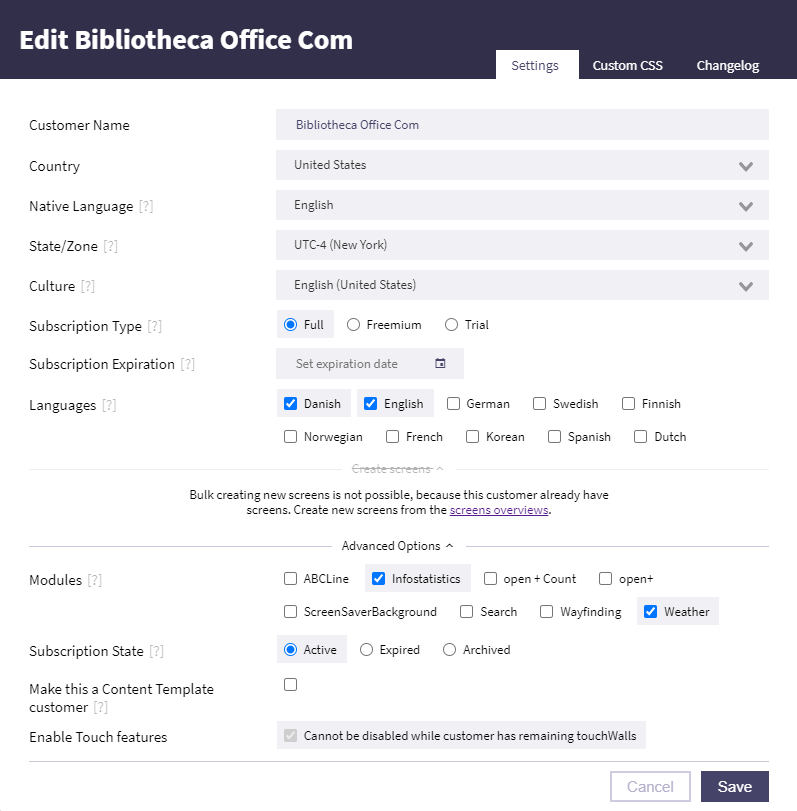
When seeing this window you can hover the [?]s to get an explanation of the fields.
These explanations are written in the tool tips section here.
Adding a new CustomerTo add new customer, click the top right button + Add new customer
Please follow the tL Installation guide for an in depth tutorial on this.
Change log
The change log tab show which updates has been made to the current customer and what user made the changes.
-
2.2
Screens section
The Screens section lets you monitor all current applications and create new applications and customers.
Use the customer filter to get an application overview of a specific customer.
Use the state filter to view paired or unpaired applications. Paired applications have a device attached. Unpaired applications are either waiting to be paired with a device, or they're just working as virtual applications for test use or demonstration.
An application can also be marked as a "test" - if you wish to hide it independently from the list.Following properties are shown on each application item:

Software ID: the ID of the application as a unique content bundle with specific display settings.
Name: the given name of the application
Customer: the customer owning the application
Hardware ID: the ID of the device the application is currently paired to (empty if unpaired or pending)
Status: the current status of the paired device. Se table below:
-
2.2.1
Device status
Status Color Description Pending Pairing is initiated but awaiting confirmation from the device. In most cases the device is offline. Offline No contact with device. Most likely turned off or not connected to internet. Error Software is in an error state which it cannot recover from. See log (see below) and contact developer. Warning Software has met an error, but can continue displaying content. Log should be examined (see below), and reported to Dev team. New content availableThe app content have been edited, but are not yet on the device. It will be downloaded by next device startup, or you can push the "Update Content" in the Application Control Panel (see below). Downloading new contentDevice is currently downloading new content. It will display the new content once fully downloaded. Ready Device is fully updated and running. Online Device is online but currently unaware of content state. Could be recently restarted. -
2.2.2
Application Control Panel
Click on the application list item and the control panel for the application will open.
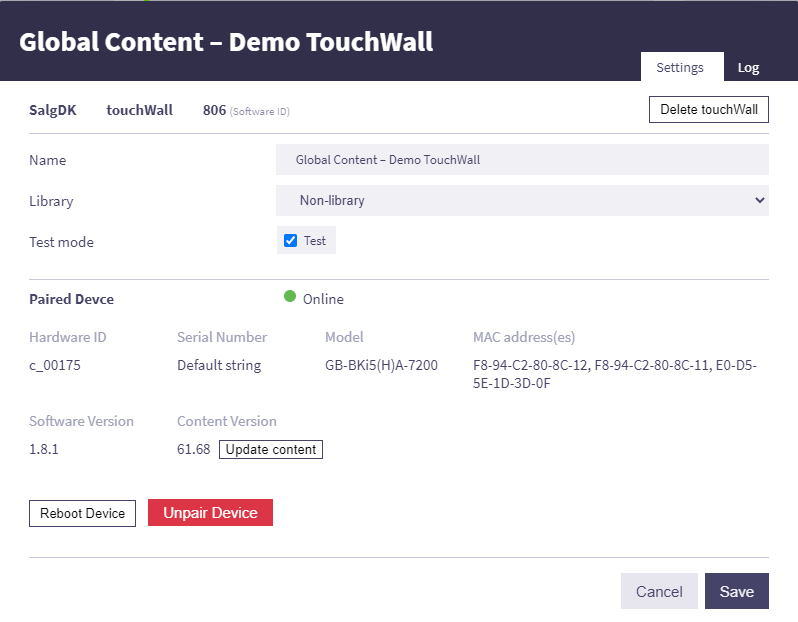
The Settings tab holds all information about the application including its name, library and if it's a dedicated test application - all editable fields.
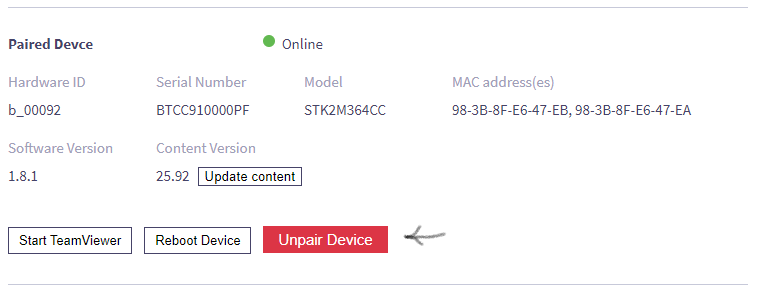
When paired with a device (like the application shown above) all given device information are displayed in the Paired Device field. The hardware information are only available if the software could successfully obtain them from the OS. From here you can Reboot the machine, enter it via TeamViewer (if it is bibliotheca hardware) and you can push the latest content to the device.
If the application hasn't been paired yet, the device field will display fields to let you pair a device see: Paring device with application
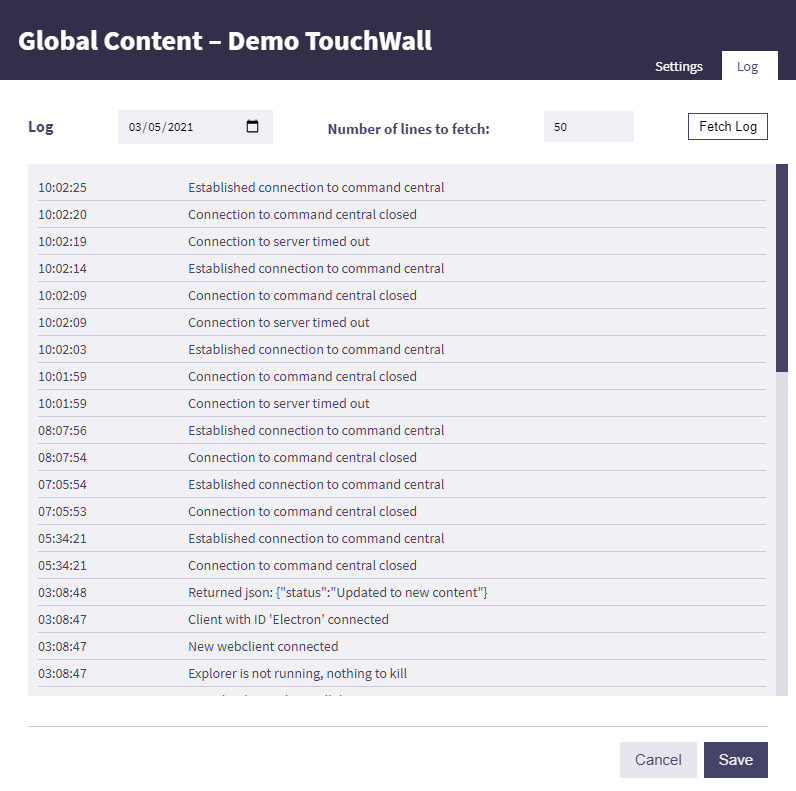
The Log tab displays the live log from the device, so you can see what actions the device has executed and what problems there might be.
-
2.2.1
-
2.1
-
3.
Create a new application
To create a new application for an existing customer, go to the Screens section of the uniFi manager.
First of, from the upper left dropdown, you must choose the customer, you wish to add a screen to.
By choosing a customer you will have new tabs on the right including screens, user, content, etc.
From the Screens tab Currently three application types are available.
Click either + Add new Screen
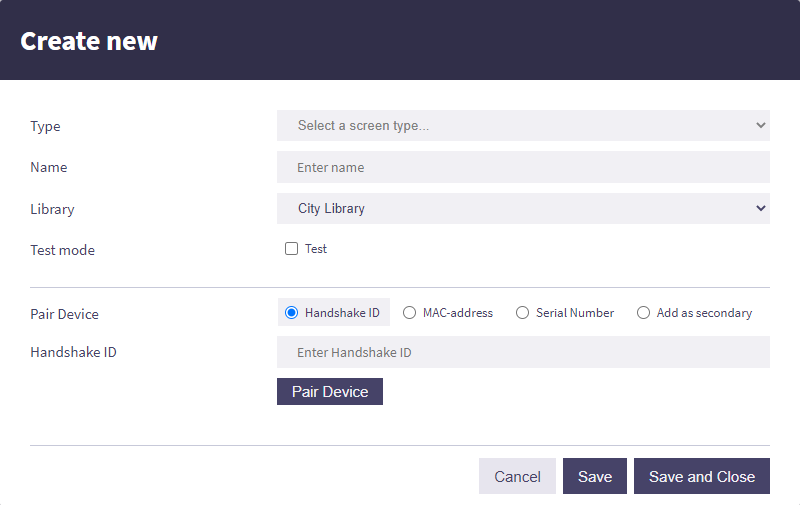
- Choose type of screen (The type CANNOT be changed after you press save)
- Choose a name
- Select a customer
- Select a library
- If the application is only for testing and you'll want to filter it out of overview check the "test" box
- If you have a device ready to host this application, fill out either the Handshake ID, Mac-address or Serial number.
Do you not have a device, you can pair the application later. More about pairing devices and applications - Press Save
- The application should now appear on the selected customers list
-
4.
Pairing device with application
There are two ways to pair an application with a device. These are primarily ment for two different scenarios:
-
4.1
Bibliotheca supplied hardware
The hardware supplied by Bibliotheca is produced with a preinstalled image. This image already contains the Transformative Library Software.
A technician or project manager can then register each device by entering either the Serial Number or the MAC-address of the hardware, without having to unwrap it or turning it on.
Devices are registered by creating the application. Enter the information in the application creator/control panel under device settings.

Once the device is running (and online), it will find the matching device on the TL server, and the pairing will be confirmed.
-
4.2
Custom hardware
On hardware not supplied by bibliotheca the software is installed on location. See Install software on device
When running the software (with connection to internet) the device will register itself on the uniFi+ server with a Handshake ID.
Until this Handshake ID has been submitted to an application, the device will appear in the Pending list in the hardware section.
Once submitted in the Application Control Panel, and the device is running the software in online state, the pairing will be confirmed.

-
4.3
Multi application pairing (screenSaver, promotion & activ directed)
Overview:
A single device can be paired with multiple applications simultaneously, including:
- ScreenSaver (uniFi+ idle)
- Promotion (uniFi+ embed)
- Wayfinding content (uniFi+ activ directed)
This setup allows kiosks (quickConnects) to:
- Display separate promotional content within the quickConnect interface.
- Show screensaver content during period of inactivity
- Show Wayfinding content when activated via quickConnect.
Steps to Pair Applications
-
Initial Pairing
- Begin by pairing a primary application (screensaver, promotion, or activ directed) to the device using one of the following methods:
- MAC Address
- Handshake ID
- Serial Number
- Once this pairing is successful, proceed to add a secondary application.
- Begin by pairing a primary application (screensaver, promotion, or activ directed) to the device using one of the following methods:
-
Adding a Secondary Application
- Select the second application you wish to pair. For example, you might want to pair an activ directed application to a device already running embed or idle.
- Open the application modal and choose the Add as Secondary option.

-
Selecting a Compatible Pair
- You will see a list of valid applications or combinations already paired to a device. Compatibility is determined by the following rules:
- The application is on the same branch as the selected application.
- It is already paired with a device.
- The secondary application's type differs from the currently selected application.
- You will see a list of valid applications or combinations already paired to a device. Compatibility is determined by the following rules:
-
Finalizing the Pairing
- Select the desired option from the list and click Save.
- The applications will now be successfully paired with the same device.
-
4.4
Unpairing
It's possible to unpair an application with it's current device.
This can be convenient in cases where the hardware is broken and the application must be moved to new device. Or if the device has accidently been paired to the wrong application. Unpairing and re-pairing will ensure that the exact same content is shown on the new device.Click the unpair-button in the Application Control Panel
-
4.1
-
5.
Install software on device
-
5.1
Find latest version of the software
The latest version of the client software can be downloaded from here: Latest client version
Should you install an old version by mistake or necessity, the client will update itself automatically to the newest version if it is online.
-
5.2
Install the software on customer hardware
- The installer is named “transformativeLibrary Setup x.x.xx.exe”, where the x’s refer to the version number. Double click the installer to start the installation. It can be installed from the Desktop or any folder of your choosing - it will install itself to c:/bibliotheca.
- The installer requires no user input, so once it is done, it will start the software.
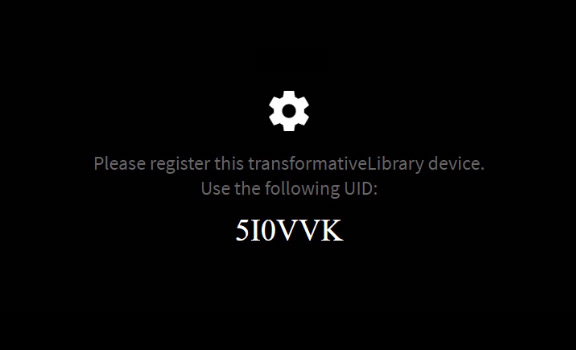
- If the device is not paired you will see a Handshake ID on the screen that can be used when pairing the device. Write it down and use it for the pairing in unifi+ Manager (see Pairing device with application - Custom hardware).
- After pairing is completed, the device should be restarted
SCREENSAVER ONLY:
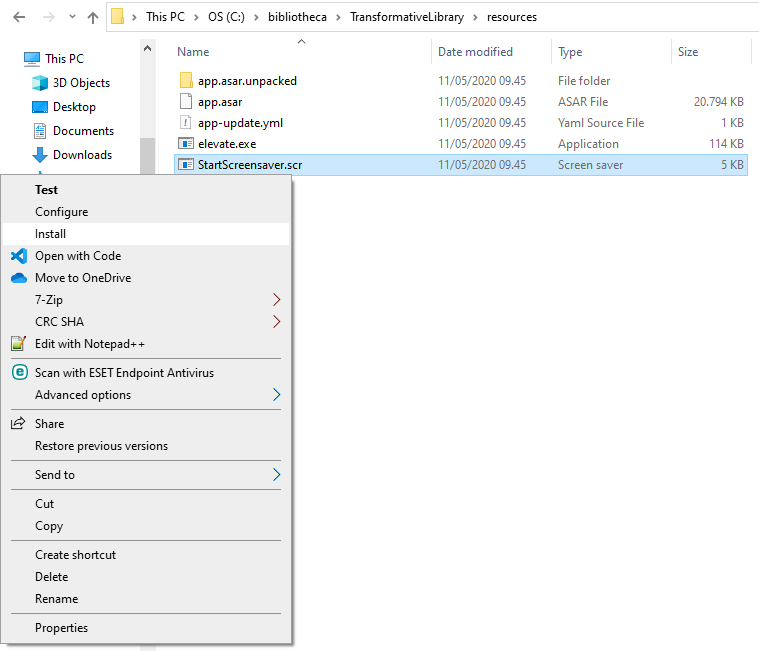
- After the restart, navigate to C:\bibliotheca\TransformativeLibrary\resources
- Right-click StartScreensaver.scr, and select install
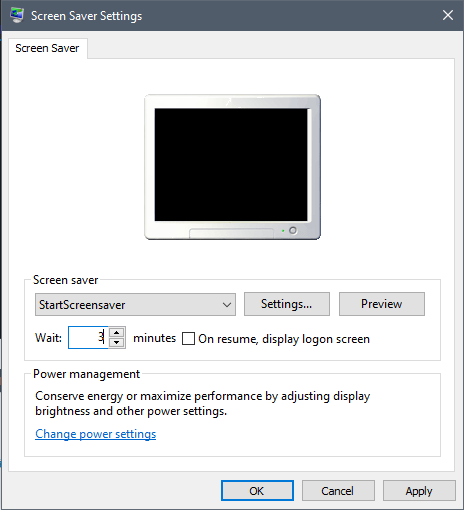
- Timeout should be set to 3 minutes

- IF TOR3 INSTALLATION
- Navigate to C:\TOR3\Config\machinespecific.ini
- Under [Config] add screen.mode=nonExclusive
- IF qC INSTALLATION
NB! quickConnect must be updated to v1.83.1 or later for transformativeLibrary screenSaver to work
The screensaver will run happily along with quickConnect on a kiosk, but in order to ensure it does not start-up when someone is partway through a transaction, and that it quickly hides as soon as someone start to use the kiosk, there is a configuration that needs to be set:
- Go into configurator and find the section ‘TransformativeLibraryScreenSaverManager’:
- Set ‘IsEnabled’ to ‘true’ then save the configuration.
- There are 3 other related configurations – but these should all be left at their defaults. Here is an explanation of them:
- IsMouseMovementAllowed
- By default, quickConnect will use emulated mouse movements to ensure the screensaver does not start during patron or staff use of the kiosk.
- If quickConnect is being used for a demonstration on a normal PC with a mouse then this can be disabled.
- IsKillSwitchEnabled, KillSwitchUri
- By default quickConnect will use the ‘killswitch’ method of removing the screensaver when patron or staff interaction is started. This can be disabled for compatibility with other screensaver solutions.
The screensaver should now start after three minutes
-
5.3
Uninstall client software
You can view (and uninstall) the software from the path
“Control Panel\Programs\Programs and Features”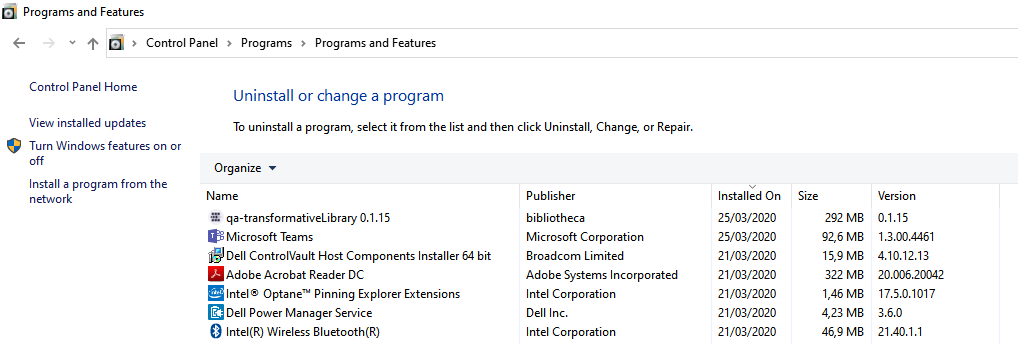
There is also an uninstaller in C:\bibliotheca\TransformativeLibrary which you can use.
-
5.1
-
6.
uniFi Manager Tool Tips
-
6.1
Native Language
The Native Language is the language the customer's passive screens (infoWall and screensavers) are shown in. And it's the default language on touchWalls. -
6.2
Culture
The Culture sets the date formats and translations of day and month names.
eg. Canadian English (en-CA) :
July 15, 2020 09:55 p.m.
eg. Canadian French (fr-CA) :
15 Juillet 2020 21 h 55
Notes:The given Culture choices are narrowed down by the chosen country. If you need a culture that is not on the list, you might want to change the country.
Secondary languages does not have a culture setting. These are only in use on touchWalls when a user changes the language. Here the culture will be a qualified guess from the country setting and current language.
-
6.3
State/Zone
The State/Zone sets the time zone of the customer. This ensures that the screens know the time of their physical location.
-
6.4
Subscription Type
The Subscription Type determines the amount of functionality the customer will have. A banner in the Administration program shows the customer their subscription type and time to expiration.
- Trial - Have the full functionality but only in a short period of time. The standard expiration of a trial period is 1 month, but the expiration can be set individually for a customer.
- Freemium - Have access to have 3 articles published.
- Full - Have the full functionality of transformativeLibrary.

Example of the banner the customer will see in the Administration.
-
6.5
Subscription Expiration
The Subscription Expiration defines the date where the customer’s current subscription ends.
When the subscription is expired, the customer will still have access to Administration, but the screens will not show the customer's content.
-
6.6
Languages
The Languages supported for the customers screens. All content can be translated into these languages in the Administration.
If the content is not translated, the content of the native language will be shown together with a ’Not translated yet’ notification.
-
6.7
Create New Screens
Bulk Create New Screens for new a customer without any existing screens. Choose to create any number of new touchWalls, infoWalls or screenSavers.
-
6.8
Add content to new screens
Add pre-created content to the bulk created screens. Choose between the content templates. The added content will be the same across e.g., all touchWalls.
Adapting of the content is possible in the Administration afterwards.
-
6.9
Modules
Enable relevant Modules for customers. A description of each types of modules can be found under Subthemes in the manual.
-
6.10
Content Template
Select the customer to be a Content Template. When enabled the customer can be copied when bulk creating new screens (only possible when creating a customer with existing screens).
The customer must have only 1 touchWall, infoWall and screenSaver with content translated into all available languages.
-
6.11
Subscription State
The Subscription State is whether the customer’s subscription is Active, Expired or Archived.
The customer has access to the Administration when the state is either Active or Expired. But the screens will only show the customer’s content when in an Active state.
When Archived the account can be activated again anytime later.
-
6.12
Customer Contact Person
When creating a new customer, insert name and email to create the primary contact person. This will same time be created as an admin user with all privileges.
For previously created customers, please chose from the dropdown, which of the current users are the primary contact person.
-
6.1
-
7.
uniFi+ Installation guide
The purpose of this document is to guide technicians in setting up and installing uniFi+ customer accounts, including Freemium, Trial and Premium accounts.
Differences between the 3 types of accounts are Subscription Type, Subscription Expiration and the Content Bundle chosen as the default. See below:


-
7.1
Before starting
Please make sure you have the following available before starting the installation:
- Information from sales on the library including
- The name of the library + country/language
- Identification of the selfchecks (quickConnect ID + location name)
- Email on at least one person from the library that should be granted access to tlAdmin
(from there they can create more users themselves)
- quickConnect must be updated to v1.83.1 or later for uniFi+ screenSaver to work
- Access to uniFi+ Manager (https://transformativelibrary.com/TLManager)
- If you do not have a login to uniFi+ Manager yet, please reach out to Morten Ohlsson on Teams
or mail (m.ohlsson@bibliotheca.com) to request one.
- If you do not have a login to uniFi+ Manager yet, please reach out to Morten Ohlsson on Teams
- Information from sales on the library including
-
7.2
Create a customer account
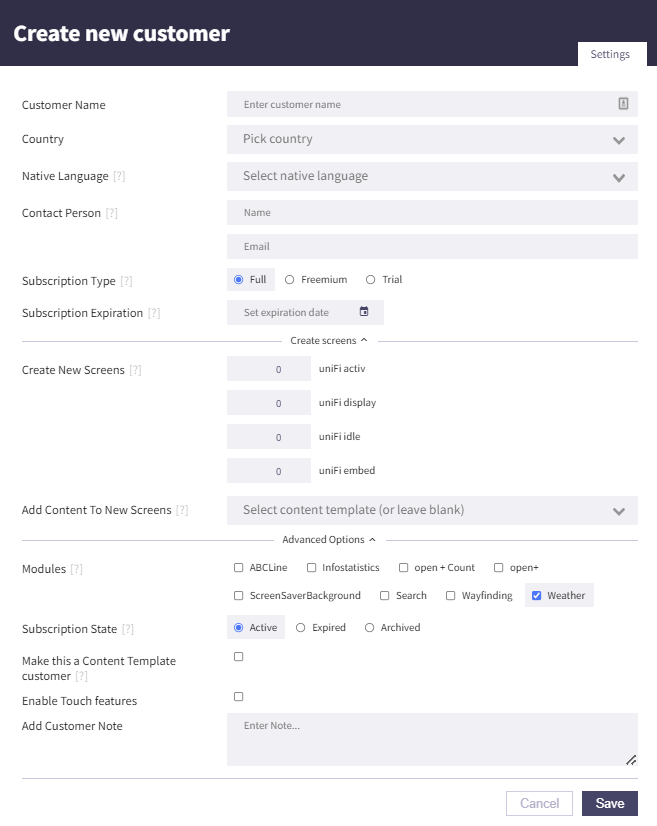
Creation of an account is done through uniFi+ Manager. Login to uniFi+ Manager and
1. Click +Add button to create a new customer.


2. Fill out the form and click the Save button.
Type in the customer’s name and select the relevant country and languages:
- Native language - should be the most commonly used language by the customer.
- Languages - pick the primary language once more and if needed add additional languages.
- Contact person - insert the name and email of the primary contact person of the library. A user for the customer will be created with these informations. This is optional and users can be created at a later point in time in the User-menu. When editing the customer, a list of existing users on the customer can be selected instead.
- Subscription type – set this to Freemium, Trial or Premium, depending on the customer in question.
- Expiration date – Freemium (not required), Trial (required), Premium (not required).
- Create new screens – Freemium only supports up to 5 screensavers. Trial and Premium support unlimited touchWalls, infoWalls, screenSavers and promotions. Choose the number of screensavers to setup.
- Add content to new screens:
– For Freemium choose “Freemium content bundle” to copy the content to the new account.
– For Trial and Premium choose “Global content bundle” to copy the content to the new account.
Content will automatically be attached to the screens created
- Modules – If the customer has open+ count and/or open+ access, check this module – leave the rest with defaults.
- Subscription state – leave this active.
- Make this a content template customer – leave this unchecked.
- Enable touch features – leave this unchecked.
- Add customer note - additional information about the customer can optionally be written here.
-
7.3
Create a new user
To create a new user for the newly created customer:
1. Click the Users button.
2. Click the +Add new user button.


Since this is the primary user, remember to grant all rights!


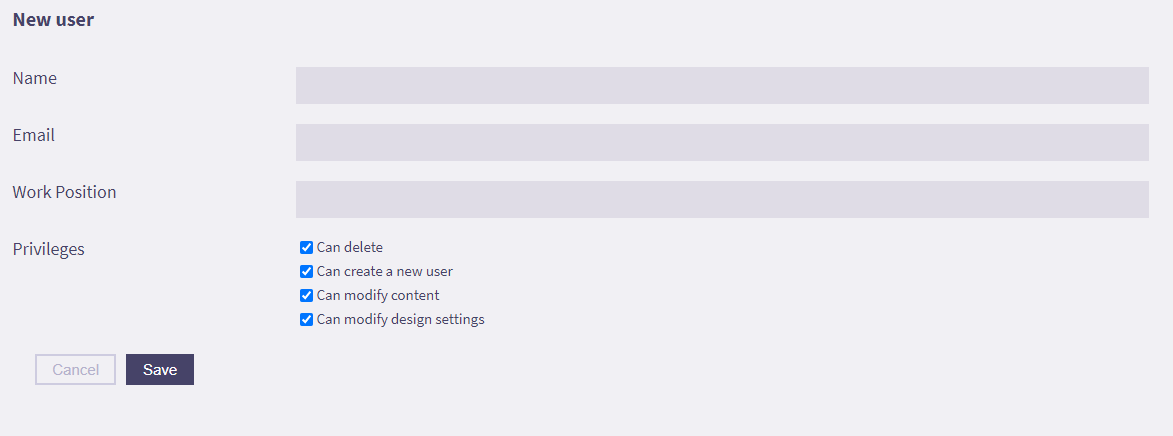

3. Fill in the information, and then click the Save button.
NB! Please note that this action will send an email to the customer with login-information so please have all steps above done before creating the account!
-
7.4
QuickConnect and screenSavers
Now with the customer account created and the screens/content added to the account, it’s time to install
the screenSavers on the quickConnect installations.To do this, please follow the updated guide here: http://help.transformativelibrary.com/internal-manual/install-software-on-device/
-
7.5
quickConnect and uniFi+embeds
Starting from quickConnect v2.2.6 it is possible to integrate transformativeLibrary with quickConnect. To set this up, a promotion first has to be installed on the system.
In the quickConnect System Manager tool, select Appearance -> Promotions. If the transformativeLibrary client should be in control of all the content, make sure to remove the standard selection. Choose "+ Add Web Promotion" and type in

as the URL.
-
7.6
Test the screenSavers
For each of the screenSavers, please test that the screenSaver is actually being opened and that default
content is presented. -
7.7
Optional: Integration with open+ Count
If the customer has ordered open+ count integration follow these steps:
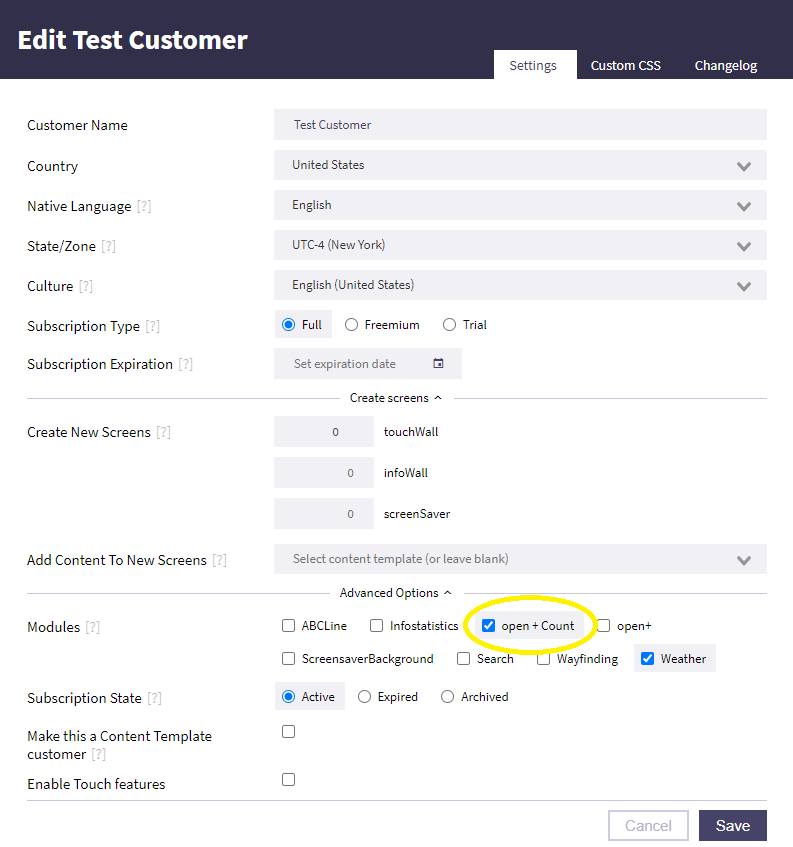
1. Select your customer in the dropdown, and click the Edit button.


2. Under “Modules”, check the box for “open+ Count”, and then click the Save button.


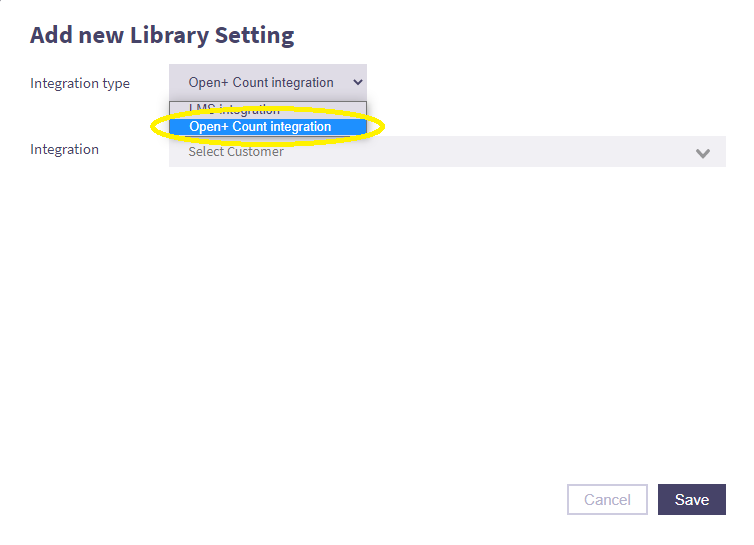
3. Go to the “Integrations” tab and click the + Add new button.

4. From the dropdown select “open+ Count integration”.
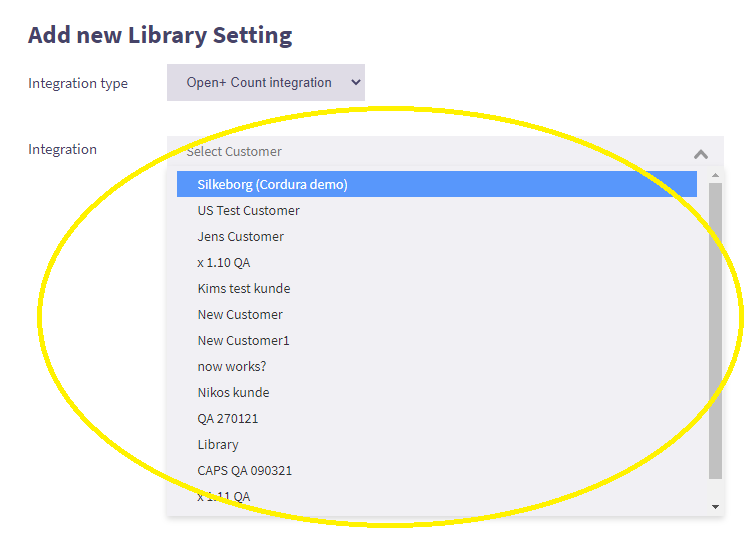
5. Select the correct customer from the “integration” dropdown, and click the Save button.
-
7.8
Optional: Integration with open+ Access
If the customer has open+ access, please reach out to 3. level support (Morten Ohlsson – m.ohlsson@bibliotheca.com)
-
7.9
Known issues
Known issues
On some older kiosk disk images there is a service installed called ‘BGInfoEventWatcher’ which can sometimes prevent the Transformative screensaver from showing.
This service should be disabled using the following steps:
- Open Task Manager
- Select the ‘Startup’ tab
- If there is an entry in the list called ‘BGInfoEventWatcher’ then select it and click ‘disable’
- Reboot the kiosk
-
7.1